Run Synapse Matrix homeserver in Docker Containers. In recent years, the use of Docker containers to run applications has become increasingly popular. But what about running a home server in a Docker container? In this article, we will discuss the advantages and potential challenges of running a Synapse Matrix homeserver in Docker containers.
The first advantage of running Synapse Matrix homeserver in docker is that it can simplify the setup process. A standard Synapse installation involves setting up complex components such as Postgres, web server, and application layer services. But with a Docker container, the entire setup can be done in just a few steps. This makes it ideal for those who don’t have a lot of technical expertise or time to dedicate to setting up their own home server.
Furthermore, running a Synapse Matrix homeserver in Docker containers can improve the security of the system. By using an isolated container, users can ensure that their system is more secure than one without. This can help them protect their data from being accessed by malicious actors. Additionally, Docker containers can help reduce the surface area of attack, making it harder for attackers to penetrate the system.
However, there are some challenges to consider when running Synapse Matrix homeserver in Docker containers. One of the major challenges is that some of the components might not be compatible with a Docker container. This can lead to errors or other challenges that are difficult to debug. Additionally, running a Synapse Matrix homeserver in Docker containers requires a good understanding of container orchestration. If the user does not have a strong understanding of this concept, it could cause significant problems.
Matrix is the open-source standard protocol used in real-time communications such as VoIP/WebRTC signalling, Internet of Things communication, messaging and video calls. It supports bridges to various messaging alternatives such as Slack, IRC, Telegram or any other XMPP client while providing end-to-end encryption.
Matrix mainly works to eliminate the problem of fragmented IP communications. Users are able to message and call each other without having to care what app the other user is on. By doing so, Matrix aims to act as a generic HTTP messaging and data synchronisation system for the whole web which will allow people, services and devices all over the planet to communicate with ease.
A homeserver can be defined as any implementation deployed on a server that can be accessed through any Matrix client such as Element
Matrix provides the following:
- Open Standard HTTP APIs for transferring JSON messages including:
- Client-Server API: defines how clients communicate with Matrix home servers.
- Server-Server API – defines the communication between Matrix home servers(how they exchange messages and synchronise history with each other)
- Application Service API – defines how to extend the functionality of Matrix with ‘integrations’ and bridge to other networks.
- Modules – specifies features that must be implemented by particular classes of clients.
- Open source reference implementations of:
- Clients (Web (React), iOS, Android)
- Client SDKs (Javascript, Web (React), iOS, Android)
- Home servers (Synapse)
- Application Services (bridges to IRC, Slack, Skype, Lync e.t.c)
- 3rd party contributions of clients, SDKs, servers and services.
- The whole ecosystem and community of everyone running Matrix servers and services
Synapse is an open-source Matrix home server developed by the Matrix.org Foundation in 2014. This tool written in Python 3/Twisted is intended to showcase the concept of Matrix and allow users to run their own home servers which will generally help bootstrap the ecosystem. Setting up a private home server is a good practice among friends, family or colleagues. This can act as the day-to-day communication medium within your home server while keeping all the data will be safe and secure in your server
In this guide, we will learn how to Synapse Matrix home server in Docker Containers.
Step 1: Install Docker and Docker Compose
For this guide to work, you need to have both docker & docker-compose installed on your system. The guide below can help you install Docker Engine on Linux
Once Docker has been installed, ensure that the service is started and enabled
sudo systemctl start docker && sudo systemctl enable dockerNow add your system user to the docker group to be able to execute the docker commands without being required to use sudo as the prefix:
sudo usermod -aG docker $USER
newgrp docker
You can then proceed and install Docker Compose using the guide below:
Step 2: Create Persistent Volumes for Synapse Matrix
In order to persist data for the containers, we need to create persistent volumes and map them accordingly to our containers. For this case, we will have two volumes, one for Synapse and the other for PostgreSQL.
These volumes can be created with the commands;
sudo mkdir -p /data/synapse /data/postgresdata
sudo chmod -R 775  /data/
On Rhel -based distributions set SELinux in permissive mode with the command:
sudo setenforce 0
sudo sed -i 's/^SELINUX=.*/SELINUX=permissive/g' /etc/selinux/config
Step 3: Run Synapse Matrix in Docker Containers
For production environments, it is not recommended to containers using docker runinstead, Docker Compose is used.
To run the container, you need to create a YAML file.
mkdir synapse && cd synapse
vim docker-compose.yml
In the file, add the below lines:
version: "3.3"
services:
    synapse:
        image: "matrixdotorg/synapse:latest"
        container_name: "synapse"
        volumes:
            - "/data/synapse:/data"
        environment:
            VIRTUAL_HOST: "synapse.computingforgeeks.com"
            VIRTUAL_PORT: 8008
            SYNAPSE_SERVER_NAME: "synapse.computingforgeeks.com"
            SYNAPSE_REPORT_STATS: "yes"
        ports:
            - "8008:8008/tcp"
            - "8448:8448/tcp"
In the above file, we have several configurations. These include:
- SYNAPSE_SERVER_NAME pointing to the FQDN of your Synapse server
- VIRUAL_PORT: 8008 exposes HTTP port 8008 for its clients to communicate with it.
Now generate a configuration file in the /data/synapse directory:
docker-compose run --rm synapse generateOnce complete, you will have a file named homeserver.yaml in the /data/synapse directory. This file contains the configuration for the Synapse server.
Open the file for editing:
sudo vim /data/synapse/homeserver.yamlIn the file, ensure that:
The server_name variable is set to the subdomain of your choice, similar to that set in the variable SYNAPSE_SERVER_NAME
Ensure that enable_registration is set to true so that you can create new accounts from the client. You can also create new users from the admin API with the registration_shared_secret set. Once registration is enabled, you need to set one of the below;
enable registration without verification to true: this does not require email or captcha verification. However, this option is not recommended, as registration without verification is a known vector for spam and abuse.
Or set a CAPTCHA
For example:
enable_registration: true
enable_registration_without_verification: true
Save and exit then proceed as shown below.
Step 4: Use the PostgreSQL database for Synapse (Optional)
By default, Synapse uses SQLite as its database. This can be used for testing purposes, but for a serious deployment, it is recommended that you use PostgreSQL. This can be done by editing the docker-compose.yml
vim docker-compose.ymlIn the file add the below lines
version: "3.3"
services:
    synapse:
        image: "matrixdotorg/synapse:latest"
        container_name: "synapse"
        volumes:
            - "/data/synapse:/data"
        environment:
            VIRTUAL_HOST: "synapse.computingforgeeks.com"
            VIRTUAL_PORT: 8008
            SYNAPSE_SERVER_NAME: "synapse.computingforgeeks.com"
            SYNAPSE_REPORT_STATS: "yes"
        ports:
            - "8008:8008/tcp"
            - "8448:8448/tcp"

    postgresql:
        image: postgres:latest
        restart: always
        environment:
            POSTGRES_PASSWORD: somepassword
            POSTGRES_USER: synapse
            POSTGRES_DB: synapse
            POSTGRES_INITDB_ARGS: "--encoding='UTF8' --lc-collate='C' --lc-ctype='C'"
        volumes:
            - "/data/postgresdata:/var/lib/postgresql/"
The POSTGRES_INITDB_ARGS variable is used here to set the collation, ctype and encoding used for the Postgres database.
Now edit the configuration file:
sudo vim /data/synapse/homeserver.yaml To accommodate the PostgreSQL database, make the below changes:
##Remove the below lines###
database:
    name: sqlite3
    args:
        database: /path/to/homeserver.db

##Add the below lines##
database:
    name: psycopg2
    args:
        user: synapse
        password: somepassword
        host: postgresql
        database: synapse
        cp_min: 5
        cp_max: 10
Now we have set the database to use psycopg2(the PostgreSQL Python adapter). Save the file and start the containers:
docker-compose up -dVerify if the containers are running:
$ docker ps
CONTAINER ID   IMAGE                         COMMAND                  CREATED          STATUS                    PORTS                                                                                            NAMES
05d762cdbaec   postgres:latest               "docker-entrypoint.s…"   23 seconds ago   Up 21 seconds             5432/tcp                                                                                         synapse-postgresql-1
99c346a3c558   matrixdotorg/synapse:latest   "/start.py"              23 seconds ago   Up 21 seconds (healthy)   0.0.0.0:8008->8008/tcp, :::8008->8008/tcp, 0.0.0.0:8448->8448/tcp, :::8448->8448/tcp, 8009/tcp   synapse
Step 5: Access Synapse Matrix homeserver
Once the containers are running, you can access the Synapse Matrix homeserver. To verify if it is working, use the URL http://domain_name:8008
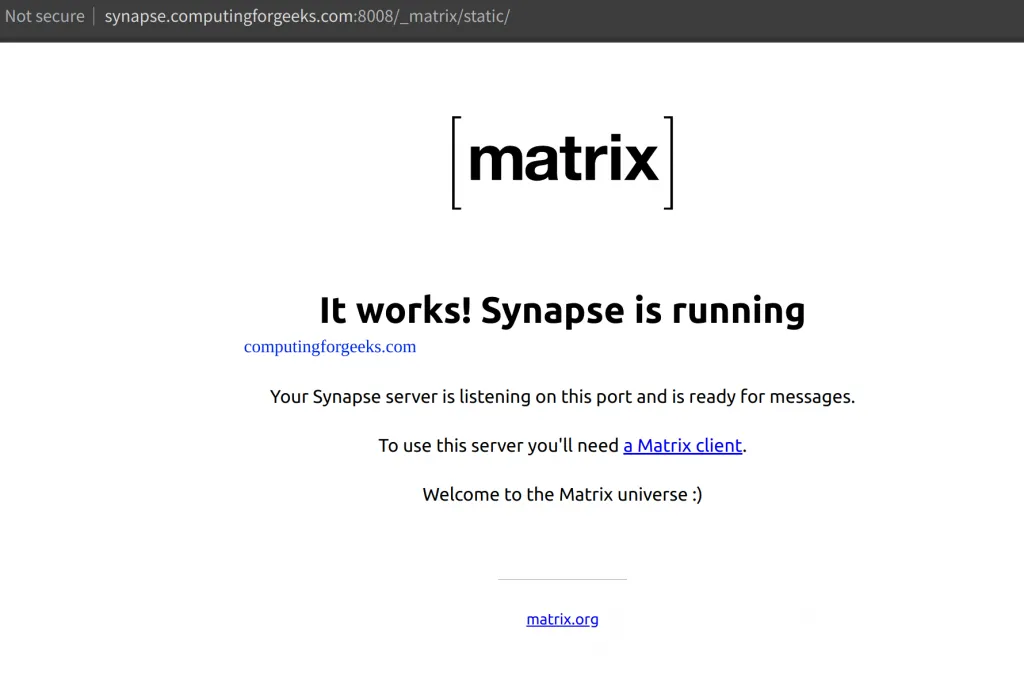
You now need a client to be able to use it like a messaging tool since Synapse is just an implementation of the Matrix protocol. There are several Matrix clients available in the market. For this guide, we will use the Riot web client which has an easy-to-use interface.
For this guide, we will deploy Riot web client on Docker, using the command:
docker run -d -p 80:80 bubuntux/riot-webOnce the container is running, access Riot web client using the URL http://domain_name. You will see a sign-in page as shown.
Click on Edit to set your own Matrix homeserver
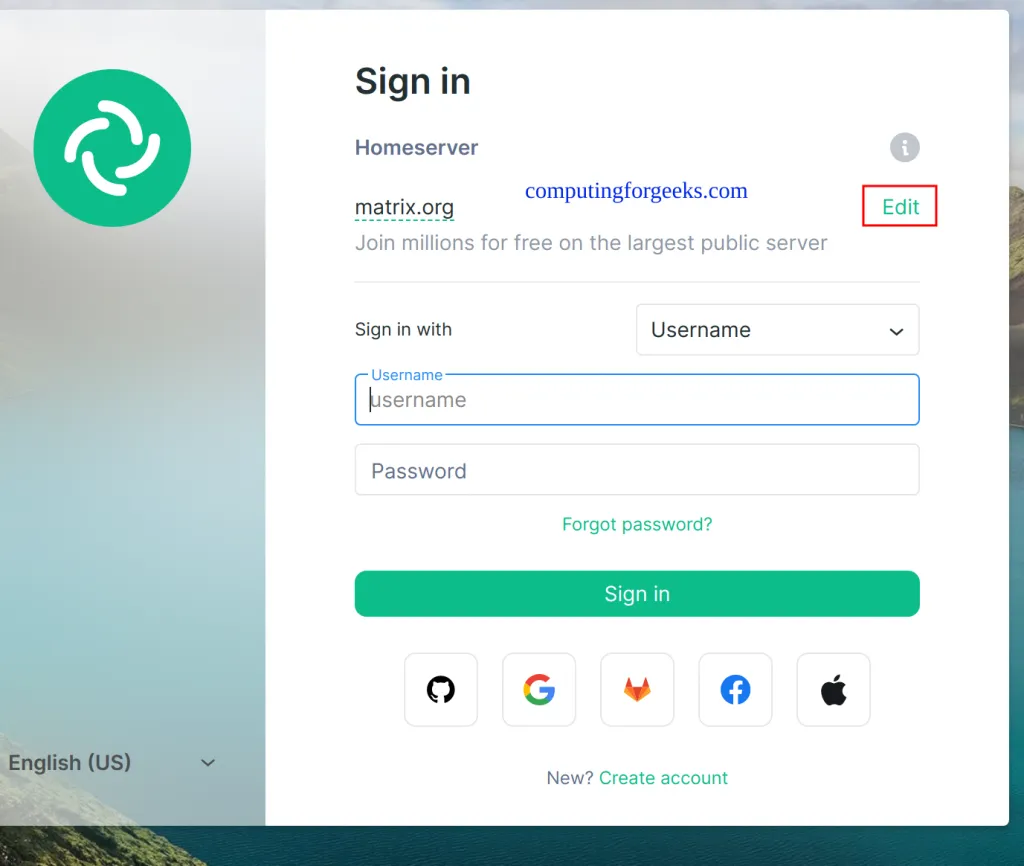
Now provide the URL of your Synapse Matrix homeserver.
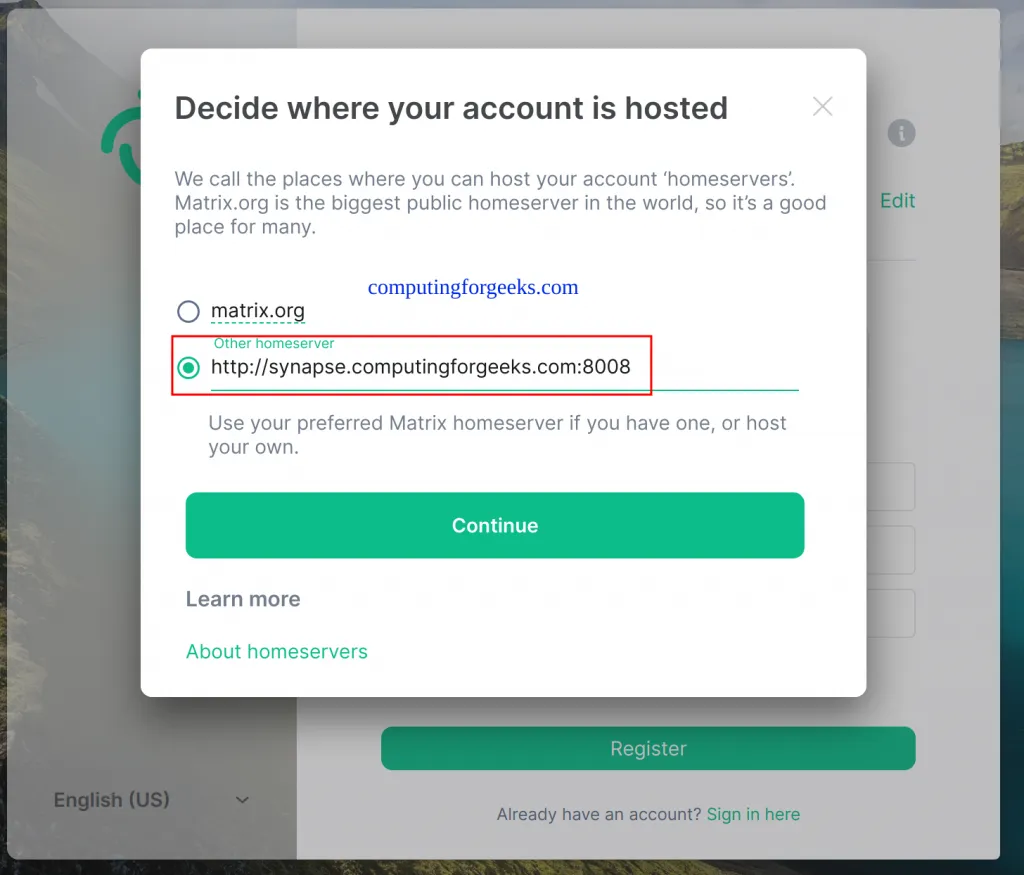
A connection to your server will be established. Now you can create a user by providing the credentials as shown.
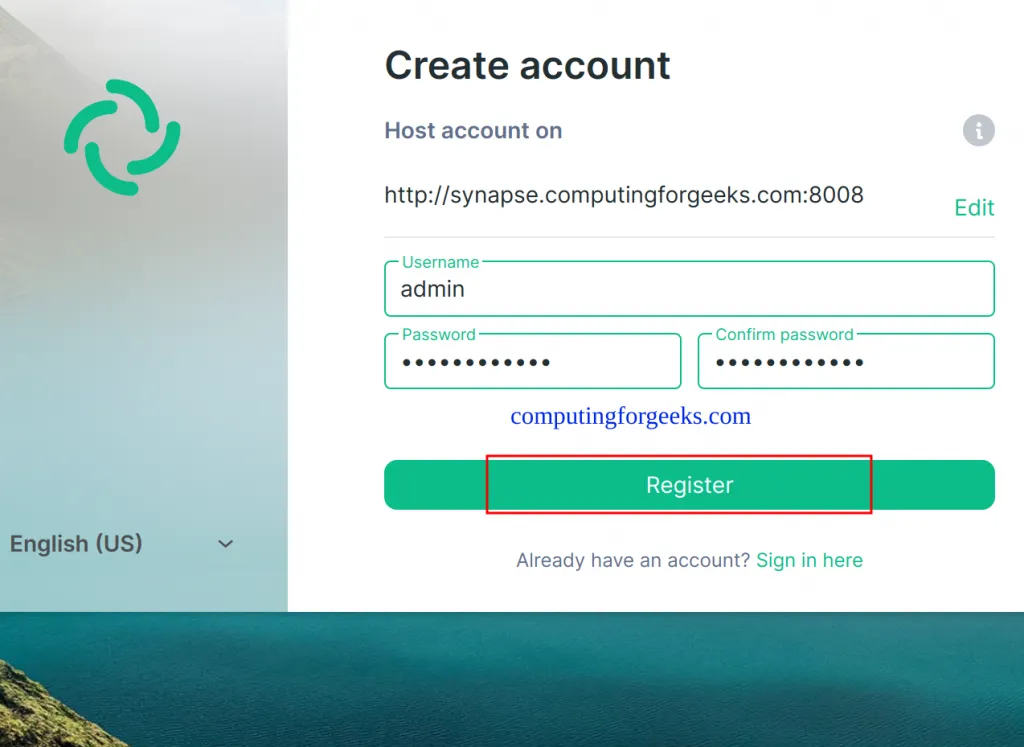
You can also create a user from the command line using the command with the syntax below
docker exec -it synapse register_new_matrix_user http://localhost:8008 -c /data/homeserver.yaml -u <username> -a -p <password>Remember to provide the preferred username and password in the above command. Once created, you can use the above user to login into your Homeserver.
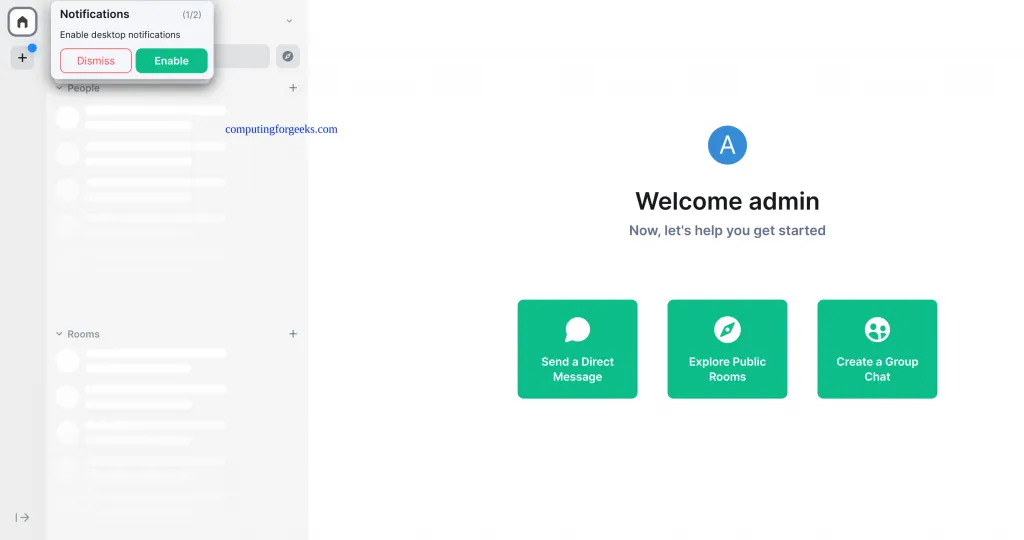
Once authenticated, you will see this.
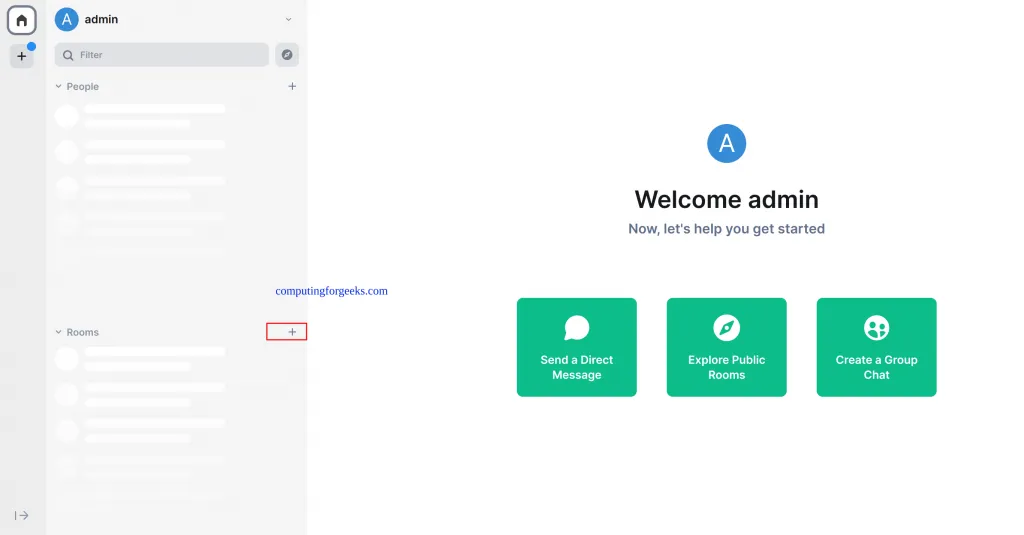
Now create a new Room by clicking on the +icon shown below.
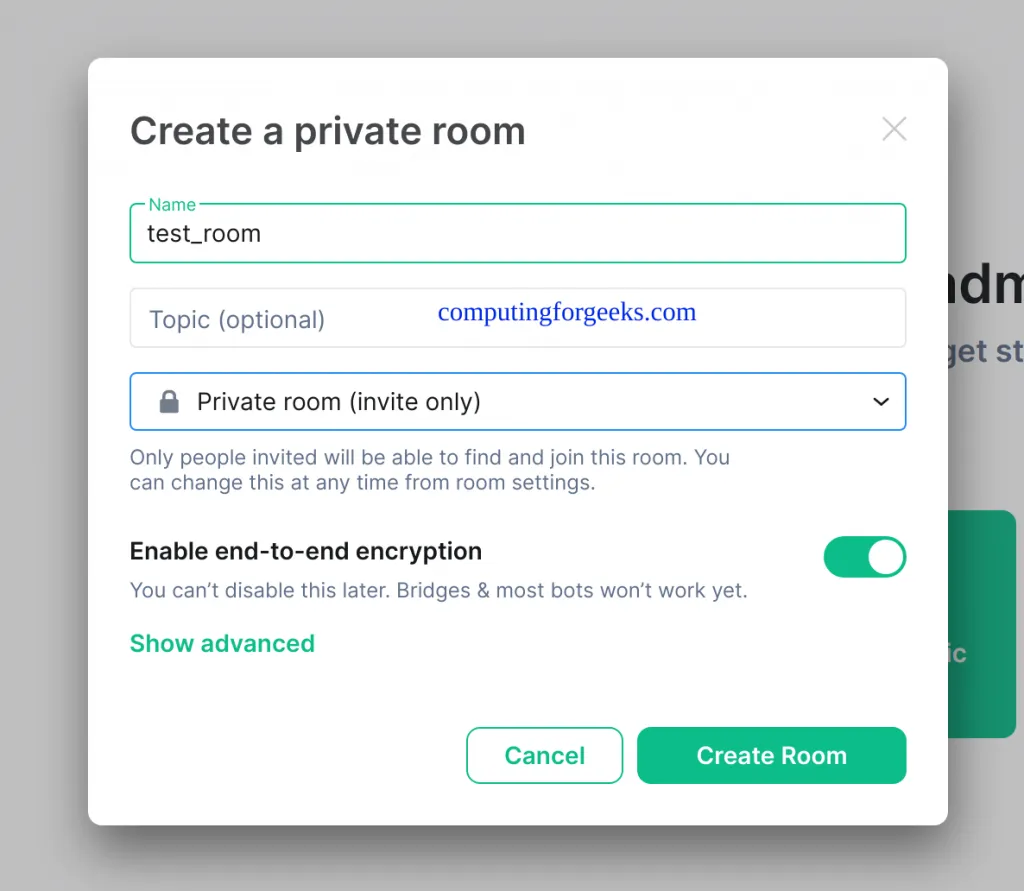
Provide the name of our Room and make the configs you prefer
Now with the room created, you can invite members and begin communication.
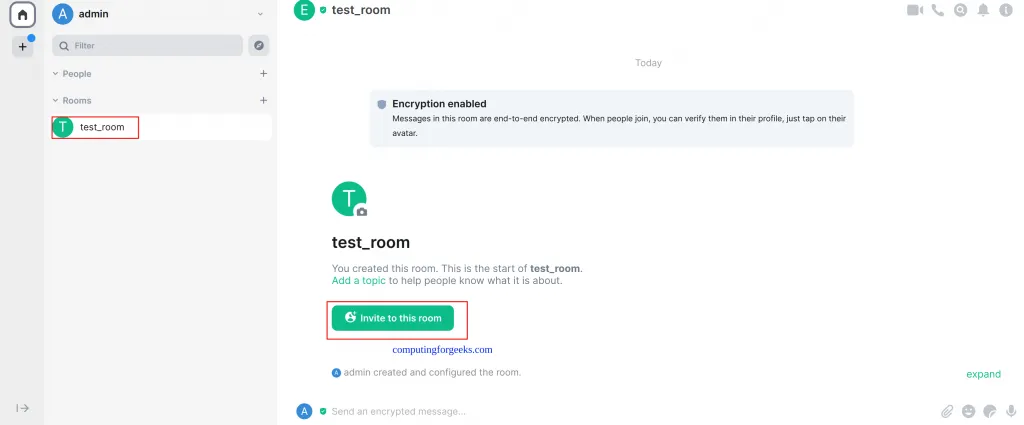
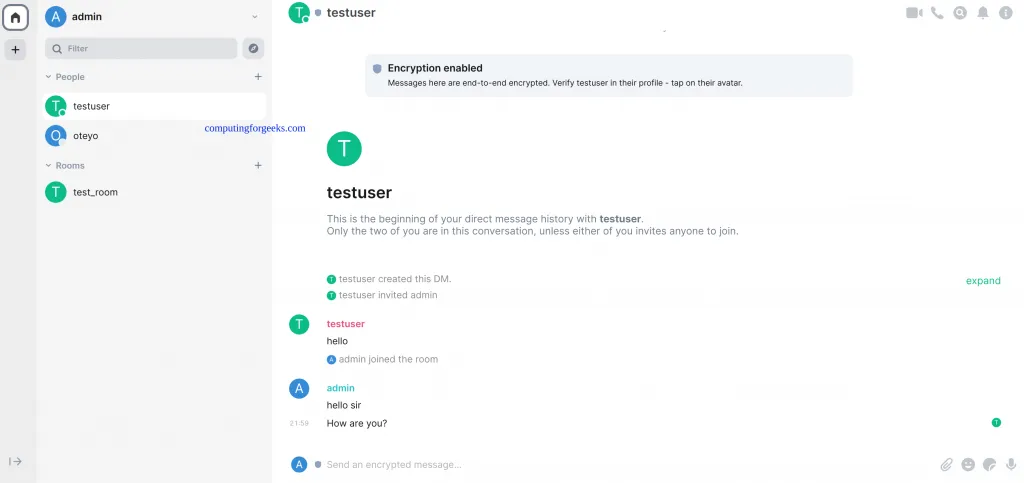
Now you can use your Synapse Matrix homeserver as desired. For example.
The end!
Verdict
We have successfully walked through how to run Synapse Matrix homeserver in Docker Containers. You now have Synapse Matrix homeserver ready to handle communication. You can also try out other clients such as the Weechat Matrix plugin which allows logging in even on the command line. Riot is also available on Android and iOS. I hope this was significant to you.
In conclusion, running Synapse Matrix homeserver in Docker containers can be a great way to simplify the setup process and improve the security of the system. However, it is important to consider potential challenges, such as compatibility issues and a lack of expertise with container orchestration, before attempting to use a Docker container to run a Synapse Matrix homeserver.

