
Installing the Asterisk 16 LTS version on Ubuntu 22.04, 20.04, and 18.04 is a relatively simple process, but requires that a few steps be taken in the correct order. Asterisk is an open-source telecommunications platform that provides a wide variety of features, such as providing VoIP, PBX, and conferencing services. This guide provides detailed instruction that will assist anyone wishing to install Asterisk 16 LTS on any of the supported operating systems.
Before beginning the installation process, it is important to ensure that your system contains all the necessary dependencies. On Ubuntu systems, the required packages can be installed with the following command:
Install Asterisk 16 LTS on Ubuntu 22.04 | 20.04 | 18.04. In this article, we will cover the steps to Install Asterisk 16 LTS on Ubuntu 22.04|20.04|18.04. Asterisk is an open source complete PBX system with features of most commercially available PBX systems. It has support for Conference calling, Direct Inward System Access, Call Parking, Call Queues and many other features.
Install Asterisk 16 on Ubuntu 22.04|20.04|18.04
Below are the steps of installing Asterisk 16 on Ubuntu 22.04|20.04|18.04.
Step 1: Update system
Start the installation of Asterisk 16 on Ubuntu by updating system to avoid any dependency issues:
sudo apt update && sudo apt -y upgrade
sudo reboot
Step 2: Install Asterisk 16 LTS dependencies
Once the system is up and updated, install all required Asterisk dependency packages:
sudo apt -y install git curl wget libnewt-dev libssl-dev libncurses5-dev subversion libsqlite3-dev build-essential libjansson-dev libxml2-dev uuid-devIf you get an error for subversion package on Ubuntu like below:
E: Package 'subversion' has no installation candidateThen add universe repository and install subversion from it:
sudo add-apt-repository universe
sudo apt update && sudo apt -y install subversion
Step 3: Download Asterisk 16 LTS tarball
Since Asterisk 16 is not available from both Debian and Ubuntu upstream repositories, the installation will be done from source. Building from source enables you to build all the PBX features you want easily and have a custom VoIP system.
$ sudo apt policy asterisk
asterisk:
  Installed: (none)
  Candidate: 1:13.14.1~dfsg-2+deb9u3
  Version table:
     1:13.14.1~dfsg-2+deb9u3 500
...

$ sudo apt policy asterisk
asterisk:
  Installed: (none)
  Candidate: 1:13.18.3~dfsg-1ubuntu4
Download the latest release of Asterisk 16 LTS to your local system for installation.
cd /usr/src/
sudo curl -O http://downloads.asterisk.org/pub/telephony/asterisk/asterisk-16-current.tar.gz
Now extract the file:
sudo tar xvf asterisk-16-current.tar.gz
cd asterisk-16*/
Run the following command to download the mp3 decoder library into the source tree.
$ sudo contrib/scripts/get_mp3_source.sh
A addons/mp3/decode_ntom.c
A addons/mp3/interface.c
A addons/mp3/MPGLIB_README
A addons/mp3/common.c
A addons/mp3/huffman.h
A addons/mp3/tabinit.c
A addons/mp3/Makefile
A addons/mp3/README
A addons/mp3/decode_i386.c
A addons/mp3/dct64_i386.c
A addons/mp3/MPGLIB_TODO
A addons/mp3/mpg123.h
A addons/mp3/layer3.c
A addons/mp3/mpglib.h
Exported revision 202.
Ensure all dependencies are resolved:
sudo contrib/scripts/install_prereq installYou should get a success message at the end:
#############################################
## install completed successfully
#############################################
Step 4: Build and Install Asterisk 16 on Ubuntu 22.04|20.04|18.04
Once you have downloaded Asterisk 16 tarball and install dependencies required, you should be ready to build Asterisk.
Run the configure script to satisfy build dependencies.
sudo ./configuresuccess should have an output like below:
..................
configure: Menuselect build configuration successfully completed

               .$$$$$$$$=..
            .$7$7..          .7$7:.
          .$:.                 ,$7.7
        .$7.     7$$           .$77
     ..$.       $$$            .$$7
    ..7$   .?.   $$$   .?.       7$$.
   $.$.   .$$7. $$7 .7$$.      .$$.
 .777.   .$$$77$$77$$$7.      $$,
 $$~      .7$$$$$$$7.       .$$.
.$7          .7$$$$7:          ?$$.
$$          ?7$$$$$I        .$$7
$$       .7$$$$$$$$      :$$.
$$       $$$7$$$$$$    .$$.
$$        $$   7$$7  .$$    .$$.
$$             $$7         .$$.
7$$7            7$$        7$$
 $$$                        $$
  $$7.                       $  (TM)
   $$$$.           .7$$$  $
     $$$$$$7$$$$$.$$$
       $$$$$$$$.

configure: Package configured for:
configure: OS type  : linux-gnu
configure: Host CPU : x86_64
configure: build-cpu:vendor:os: x86_64 : pc : linux-gnu :
configure: host-cpu:vendor:os: x86_64 : pc : linux-gnu :
Setup menu options by running the following command:
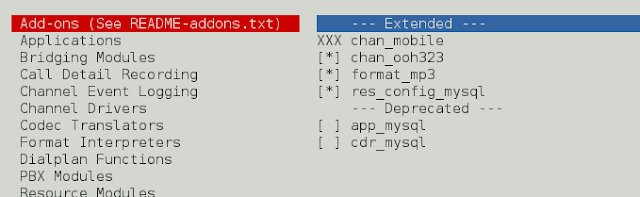
sudo make menuselectUse arrow keys to navigate, and Enter key to select.
On Add-ons select chan_ooh323 and format_mp3 as shown below
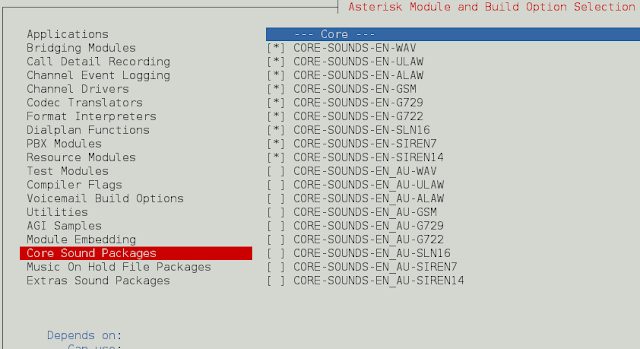
On Core Sound Packages, select the formats of Audio packets like below
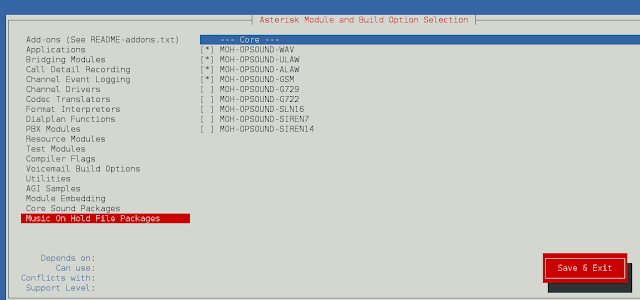
For Music On Hold, select the following minimal modules
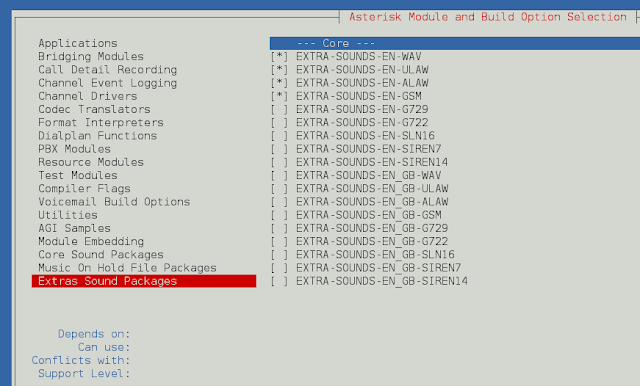
On Extra Sound Packages select as shown below:
Enable app_macro under Applications menu.

You can change other configurations you see fit. When done, save and exit then install Asterisk with selected modules.
Then build Asterisk by running:
sudo makeSample output:
Building Documentation For: third-party channels pbx apps codecs formats cdr cel bridges funcs tests main res addons
 +--------- Asterisk Build Complete ---------+
 + Asterisk has successfully been built, and +
 + can be installed by running:              +
 +                                           +
 +                make install               +
When done, install Asterisk by running the command:
sudo make installSample output:
 +---- Asterisk Installation Complete -------+
 +                                           +
 +    YOU MUST READ THE SECURITY DOCUMENT    +
 +                                           +
 + Asterisk has successfully been installed. +
 + If you would like to install the sample   +
 + configuration files (overwriting any      +
 + existing config files), run:              +
 +                                           +
 + For generic reference documentation:      +
 +    make samples                           +
 +                                           +
 + For a sample basic PBX:                   +
 +    make basic-pbx                         +
 +                                           +
 +                                           +
 +-----------------  or ---------------------+
 +                                           +
 + You can go ahead and install the asterisk +
 + program documentation now or later run:   +
 +                                           +
 +               make progdocs               +
 +                                           +
 + **Note** This requires that you have      +
 + doxygen installed on your local system    +
 +-------------------------------------------+
You can optionally install documentation:
sudo make progdocsFinally, install configs and samples.
sudo make samples
sudo make config
sudo ldconfig
A systemd service unit file for asterisk will be created.
Create Asterisk User
Create a separate user and group to run asterisk services, and assign correct permissions:
sudo groupadd asterisk
sudo useradd -r -d /var/lib/asterisk -g asterisk asterisk
sudo usermod -aG audio,dialout asterisk
sudo chown -R asterisk.asterisk /etc/asterisk
sudo chown -R asterisk.asterisk /var/{lib,log,spool}/asterisk
sudo chown -R asterisk.asterisk /usr/lib/asterisk
Set Asterisk default user to asterisk:
$ sudo vim /etc/default/asterisk
AST_USER="asterisk"
AST_GROUP="asterisk"

$ sudo vim /etc/asterisk/asterisk.conf
runuser = asterisk ; The user to run as.
rungroup = asterisk ; The group to run as.
Restart asterisk service after making the changes:
sudo systemctl restart asteriskEnable asterisk service to start on system boot:
sudo systemctl enable asteriskService should be running without errors:
$ systemctl status asterisk
● asterisk.service - LSB: Asterisk PBX
     Loaded: loaded (/etc/init.d/asterisk; generated)
     Active: active (running) since Sun 2020-05-03 12:18:29 UTC; 1min 19s ago
       Docs: man:systemd-sysv-generator(8)
      Tasks: 69 (limit: 2344)
     Memory: 112.0M
     CGroup: /system.slice/asterisk.service
             └─88786 /usr/sbin/asterisk -U asterisk -G asterisk

May 03 12:18:29 ubuntu20 systemd[1]: Starting LSB: Asterisk PBX...
May 03 12:18:29 ubuntu20 asterisk[88756]:  * Starting Asterisk PBX: asterisk
May 03 12:18:29 ubuntu20 asterisk[88756]:    ...done.
May 03 12:18:29 ubuntu20 systemd[1]: Started LSB: Asterisk PBX.
Test to see if you can connect to Asterisk CLI:
$ sudo asterisk -rvv
Asterisk 16.10.0, Copyright (C) 1999 - 2018, Digium, Inc. and others.
Created by Mark Spencer <[email protected]>
Asterisk comes with ABSOLUTELY NO WARRANTY; type 'core show warranty' for details.
This is free software, with components licensed under the GNU General Public
License version 2 and other licenses; you are welcome to redistribute it under
certain conditions. Type 'core show license' for details.
=========================================================================
Running as user 'asterisk'
Running under group 'asterisk'
Connected to Asterisk 16.10.0 currently running on ubuntu20 (pid = 88786)
ubuntu-01*CLI> core  show channels
Channel              Location             State   Application(Data)
0 active channels
0 active calls
0 calls processed
ubuntu-01*CLI> exit
Asterisk cleanly ending (0).
Executing last minute cleanups
If you have an active ufw firewall, open http ports and ports 5060,5061:
sudo ufw allow proto tcp from any to any port 5060,5061That’s it!. You now have Asterisk 16 LTS installed on your Ubuntu 22.04|20.04|18.04 server. In conclusion, it is relatively easy to install Asterisk 16 LTS on Ubuntu 22.04, 20.04, and 18.04. This guide provides detailed steps that will assist anyone wishing to do so successfully.