
Install Kubernetes Cluster on Debian 10 with Kubespray. Kubernetes is a powerful open-source container orchestration system that simplifies the management of a distributed application. As more organizations turn to containerization and cloud-native applications, deployments become more complex, so Kubernetes is becoming a popular choice for managing those applications.
In this article, we’ll go over how to install and configure a Kubernetes Cluster on Debian 10 using Kubespray. Kubespray is an open-source project for deploying Kubernetes clusters on any infrastructure, including local machines, cloud environment, or on-premise servers.
Before we dive in, there are a few prerequisites to setting up the Kubernetes cluster. You’ll need three or more servers that run Debian 10, Ansible installed on the host server, and SSH for remote access. Kubespray also requires two additional ports to be opened: 22 and 6443.
Now we can get started with the installation. First, you need to clone the Kubespray GitHub repository onto the host server. This repository contains all the resources needed to deploy a cluster. Next, you need to edit the inventory file in the repository. The inventory file contains the list of machines that will run the cluster, and you need to add the IP addresses and hostnames of the machines to the file.
After editing the inventory file, you can run the deployment commands. Kubespray provides an easy way to install and configure the cluster. All you need to do is run the command “ansible-playbook” with the appropriate options. This command will use the inventory file to deploy the Kubernetes cluster on the target servers.
Once the command is completed, your Kubernetes cluster should be up and running. You can check the status of the nodes using the Kubernetes dashboard. Now, you can start deploying your applications in the Kubernetes cluster.
Installing a Kubernetes cluster on Debian 10 using Kubespray is an easy process that provides flexibility for deploying applications and services. Kubespray allows you to quickly deploy the cluster and get started with managing and deploying container-based applications. With this guide, you’ll be able to get started with a Kubernetes cluster in no time
For those who do not know, Kubernetes will be deprecating dockershim in future releases which means they will not be supporting docker as the container runtime. Before you throw tantrums, it is important to note that the change will not be affecting how you build and deploy your images. Docker contains a lot of components that Kubernetes has no use of bearing in mind that they need a simple light-weight container runtime to launch and run containers.
As you have already guessed, you can continue building your images using docker and Kubernetes will pull and run them using other container run times such as containerd or CRI-O. Containerd and CRI-O are pretty lightweight and they plug in fantastically to the Container Runtime Interface specifications.
Installation pre-requisites
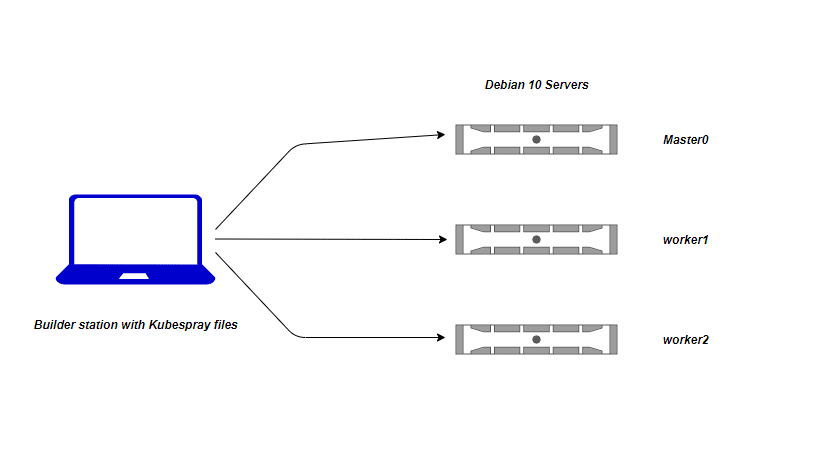
In order for this deployment to start and succeed, we are going to need an extra server or computer that will be used as the installation server. This machine will contain Kubespray files and will connect to your servers where kubernetes will be installed and proceed to setup Kubernetes in them. The deployment architecture is simplified by the diagram below with one master, one etcd and two worker nodes.
Make sure you generate SSH keys on the builder machine and copy your public key to the Debian 10 servers where Kubernetes will be built.
Having said all of that, we are going to install Kubernetes on Debian 10 servers using Kubespray and we shall be using containerd as the container runtime. The following steps will suffice to get your cluster ready to accommodate your apps.
Step 1: Prepare your servers
Preparing your servers is a crucial step which ensures that every aspect of the deployment runs smoothly till the very end. In this step, we shall be doing simple updates and making sure that important packages have been installed. Issue the commands below in each of your servers to kick everything off on a clean slate.
sudo apt update
sudo apt upgrade
Step 2: Clone Kubespray Git repository and add configurations
In this step, we are going to fetch Kubespray files in our local machine (the installer machine) then make the necessay configurations by choosing containerd as the container run time as well as populating the requisite files with the details of our servers (etc, masters, workers).
cd ~
git clone https://github.com/kubernetes-sigs/kubespray.git
Change to the project directory
cd kubesprayThis directory contains the inventory files and playbooks used to deploy Kubernetes.
Step 3: Prepare Local machine
On the Local machine where you’ll run deployment from, you need to install pip Python package manager.
curl https://bootstrap.pypa.io/get-pip.py -o get-pip.py
python3 get-pip.py --user
Step 4: Create Kubernetes Cluster inventory file
The inventory is composed of 3 groups:
- kube-node : list of kubernetes nodes where the pods will run.
- kube-master : list of servers where kubernetes master components (apiserver, scheduler, controller) will run.
- etcd: list of servers to compose the etcd server. You should have at least 3 servers for failover purpose.
There are also two special groups:
- calico-rr : explained for advanced Calico networking cases
- bastion : configure a bastion host if your nodes are not directly reachable
Create an inventory file:
cp -rfp inventory/sample inventory/myclusterDefine your inventory with your server’s IP addresses and map to correct node purpose.
$ vim inventory/mycluster/inventory.ini
master0   ansible_host=172.20.193.154 ip=172.20.193.154
worker1   ansible_host=172.20.198.157 ip=172.20.198.157
worker2   ansible_host=172.20.202.161 ip=172.20.202.161

# ## configure a bastion host if your nodes are not directly reachable
# bastion ansible_host=x.x.x.x ansible_user=some_user
[kube-master]
master0

[etcd]
master0

[kube-node]
worker1
worker2

[calico-rr]

[k8s-cluster:children]
kube-master
kube-node
calico-rr
Add A records to /etc/hosts on your workstation.
$ sudo vim /etc/hosts
172.20.193.154 master0
172.20.198.157 worker1
172.20.202.161 worker2
If your private ssh key has passphrase, save it before starting deployment.
$ eval `ssh-agent -s` && ssh-add
Agent pid 4516
Enter passphrase for /home/centos/.ssh/id_rsa:
Identity added: /home/centos/.ssh/id_rsa (/home/centos/.ssh/id_rsa)
Install dependencies from requirements.txt
# Python 2.x
sudo pip install --user -r requirements.txt

# Python 3.x
sudo pip3 install -r requirements.txt
Confirm ansible installation.
$ ansible --version
ansible 2.9.6
  config file = /etc/ansible/ansible.cfg
  configured module search path = ['/home/tech/.ansible/plugins/modules', '/usr/share/ansible/plugins/modules']
  ansible python module location = /usr/lib/python3/dist-packages/ansible
  executable location = /usr/bin/ansible
  python version = 3.8.5 (default, Jul 28 2020, 12:59:40) [GCC 9.3.0]
Review and change parameters under inventory/mycluster/group_vars
We shall review and change parameters under inventory/mycluster/group_vars to ensure that Kubespray uses containerd.
##Change from docker to containerd at around line 176 and add the two lines below

$ vim inventory/mycluster/group_vars/k8s-cluster/k8s-cluster.yml
container_manager: containerd
etcd_deployment_type: host
kubelet_deployment_type: host
Step 5: Deploy Kubernetes Cluster with Kubespray
Now execute the playbook to deploy Production ready Kubernetes with Ansible. Please note that the target servers must have access to the Internet in order to pull images.
Start the deployment by running the command:
ansible-playbook -i inventory/mycluster/inventory.ini --become
--user=tech --become-user=root cluster.yml
Replace “tech” with the remote user ansible will connect to the nodes as. You should not get failed task in execution.
Installation progress should look like below
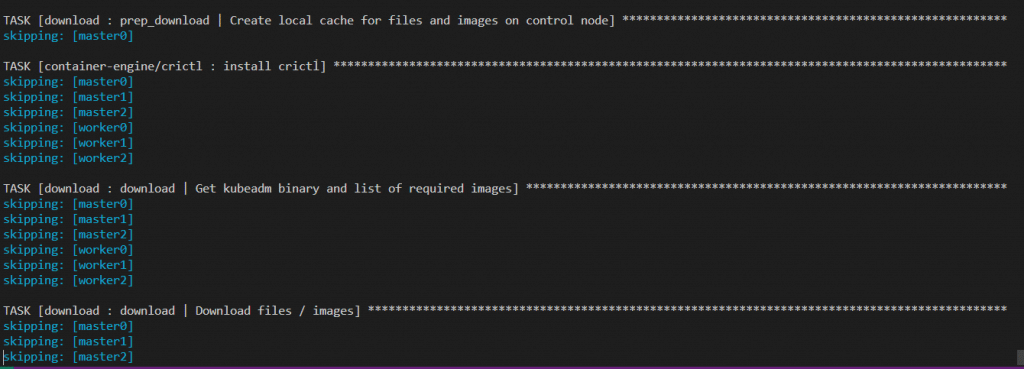
The very last messages will look like the screenshot shared below.
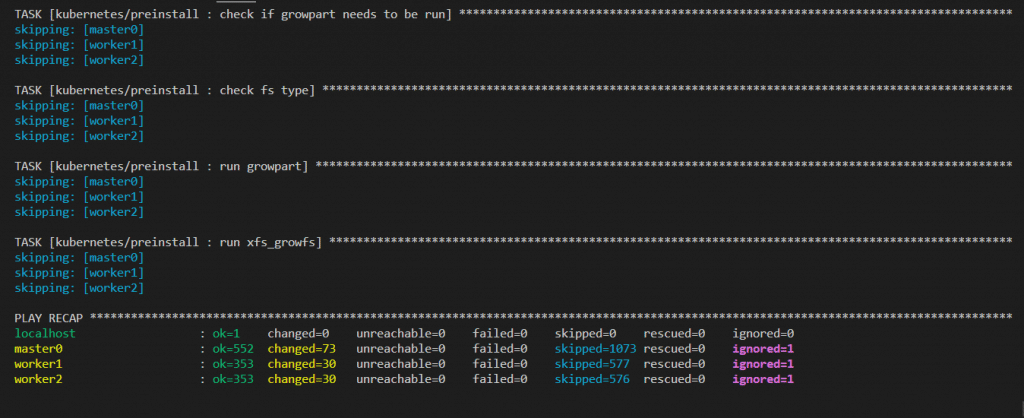
Once the playbook executes to the tail end, login to the master node and check cluster status.
$ sudo kubectl cluster-info
Kubernetes master is running at https://172.20.193.154:6443

To further debug and diagnose cluster problems, use 'kubectl cluster-info dump'.
You can also check the nodes
$ sudo kubectl get nodes
NAME      STATUS   ROLES    AGE   VERSION
master0   Ready    master   11m   v1.19.5
worker1   Ready    <none>   10m   v1.19.5
worker2   Ready    <none>   10m   v1.19.5

$ sudo kubectl get endpoints -n kube-system
NAME                      ENDPOINTS                                                     AGE
coredns                   10.233.101.1:53,10.233.103.1:53,10.233.101.1:53 + 3 more...   23m
kube-controller-manager   <none>                                                        27m
kube-scheduler            <none>
Step 6: Install Kubernetes Dashboard & Access
This is an optional step in case you do not have other options to access your Kubernetes cluster via a cool interface like Lens or VMware Octant .To get the dashboard installed, follow the detailed guide below.
- How To Install Kubernetes Dashboard with NodePort
And once it is working, you will need to create an admin user to access your cluster. Use the guide below to fix that:
- Create Admin User to Access Kubernetes Dashboard
If you like, you can also use Active Directory to authenticate your users using how to Authenticate Kubernetes Dashboard Users With Active Directory.
Step 7: Install Nginx-Ingress controller
In this step, we are going to include an ingress controller to help us access our services from outside the cluster. The simplest approach to enabling external access to services is using the NodePort service type. The disadvantage of NodePort is that services must use a limited range of ports (by default, in the 30000 to 32767 range), and just a single port can be mapped to a single service.
The ingress resource makes it possible to expose multiple services using a singular external endpoint, a load balancer, or both at once. Taking this approach, teams can enact host, prefix, and other rules to route traffic to defined service resources however they prefer.
We shall therefore install Nginx Ingress controller and configure it so that we can be able to access one sample application we will setup. To install Nginx Ingress controller, download the manifest below and apply it in your cluster
wget https://raw.githubusercontent.com/kubernetes/ingress-nginx/main/deploy/static/provider/cloud/deploy.yamlThen install using kubectl
sudo kubectl apply -f deploy.yamlConfirm that the ingress controller pod is running after sometime
$ sudo kubectl get pods -n ingress-nginx
NAME                                        READY   STATUS      RESTARTS   AGE
ingress-nginx-admission-create-f7d8c        0/1     Completed   0          109m
ingress-nginx-admission-patch-4fxtb         0/1     Completed   0          109m
ingress-nginx-controller-85df779996-b9c2k   1/1     Running     0
Next, we are going to deploy httpbin application then use our ingress controller to access it. Fetch httpbin as follows
wget https://github.com/istio/istio/raw/master/samples/httpbin/httpbin.yamlIn case you would wish it to be deployed in a different namespace, simply edit the file before applying it.
Step 8: Add Ingress Rule to access your service
Until now, we have a working ingress controller and a sample deployment (httpbin) that we shall use to test how it works. Create the following Ingress resource that will target httpbin. If you read the manifest we fetched earlier, you will notice that it creates a service called “httpbin” and will be listening at port 8000. Armed with that information, let us create an Ingress thus:
$ vim httpbin-ingress.yaml
apiVersion: networking.k8s.io/v1
kind: Ingress
metadata:
  name: httpbin-ingress
  namespace: default
  annotations:
    nginx.ingress.kubernetes.io/rewrite-target: /
spec:
  rules:
    - host: master.computingforgeeks.com
      http:
        paths:
          - path: /
            pathType: Prefix
            backend:
              service:
                name: httpbin
                port:
                  number: 8000
Save the file then apply it in your cluster. Note that “master.computingforgeeks.com” must be resolving to the IP of the ingress as shown below.
$ sudo kubectl apply -f httpbin-ingress.yaml
ingress.networking.k8s.io/httpbin-ingress configured
Then confirm that the ingress was created successfully
$ sudo kubectl get ing
Warning: extensions/v1beta1 Ingress is deprecated in v1.14+, unavailable in v1.22+; use networking.k8s.io/v1 Ingress
NAME              CLASS    HOSTS                           ADDRESS          PORTS   AGE
approot           <none>   master1.computingforgeeks.com   172.20.202.161   80      168m
httpbin-ingress   <none>   master.computingforgeeks.com    172.20.202.161   80      108m
What is happening here is that, any traffic that will come from “master.computingforgeeks.com” root url, it will be routed to the httpbin service automatically. Is that not pretty!
What else are we left to do than to test if we can reach our serivice? First, let us investigate how our Ingress Controller service looks like.
$ sudo kubectl get svc -n ingress-nginx
NAME TYPE CLUSTER-IP EXTERNAL-IP PORT(S) AGE
ingress-nginx-controller NodePort 10.233.8.37 <none> 80:30242/TCP,443:31635/TCP 123m
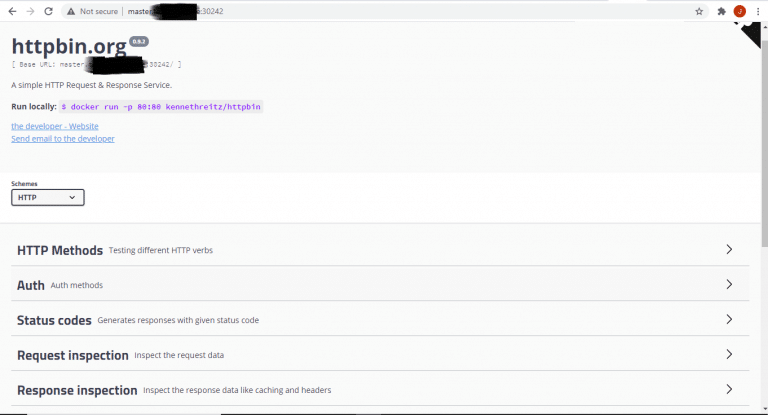
ingress-nginx-controller-admission ClusterIP 10.233.51.71 <none> 443/TCP 123m As you will notice, our “ingress-nginx-controller” is exposed via NodePort. That is very good information because we can be really frustrated while accessing our applications in other ways. With that in mind, let us now open up our browser, and point it to our application at //master.computingforgeeks.com:30242. And ensure that port 30242 has been opened in “master.computingforgeeks.com” node’s firewall. You should see something eye popping as shown below:
Conclusion
Kubespray makes the deployment of Kubernetes a cinch. Thanks to the team that developed the playbooks involved in achieving this complex deployment, we now have a ready platform just waiting for your applications that will serve the world.
In case you have a bigger cluster you intend to setup, simply place the various components (etcd, master, workers etc) in the deployment scripts and Kubespray will handle the rest. May your year flourish, your endeavor bear good fruits and your investments pay off. Let us face it with fortitude, with laughter, hard work and grace.
Other guides you might enjoy:


