
How to Install and Configure OpenLDAP Server on Rocky Linux 8 / AlmaLinux 8. OpenLDAP is a robust software directory server that provides a secure authentication and authorization infrastructure for numerous applications. In this tutorial, we will learn how to install and configure OpenLDAP Server on Rocky Linux 8 / AlmaLinux 8.
Before proceeding, it is a good practice to take a snapshot of your system as a safeguard against any unexpected issues that may arise during the installation process.
Directory services also known as name services, function as the authoritative identity provider (IdP) for several companies worldwide. They map the names of network resources to the respective network addresses.
It acts as a shared information infra for locating, managing, administering, and organizing everyday resources such as volumes, folders, files, printers, users, groups, devices, telephone numbers e.t.c. It is so essential to choose the correct directory server for your organization as it becomes the source of truth for authentication and authorization on your digital workspace.
LDAP is an acronym for Lightweight directory access protocol. This is a protocol used to access and modify X.500-based directory service running over TCP/IP. It is used to tackle authentication and share information about users, systems, services, networks, and applications from a directory service to other services/applications. It can not only read Active Directory but also be integrated with other Linux programs.
OpenLDAP is the free and open-source implementation of LDAP developed by the OpenLDAP Project and released under the unique BSD-style license called the OpenLDAP Public License. It provides a command-line utility that can be used to build and manage the LDAP directory. To use this tool, you need to have some deep knowledge of the LDAP protocol and structure. To eliminate the tussle, you can use third-party tools like phpLDAPadmin to manage the service.
OpenLDAP offers the below cool features:
- Low Costs: it is free, making it a common choice for startups.
- Flexibility: This gives it broad applicability.
- LDAPv3 Support: It offers support for Simple Authentication and Security Layer and Transport Layer Security.
- IPv6 support: OpenLDAP supports the next generation Internet Protocol version 6.
- OS-Agnosticism: It is fully supported on Mac, Windows, and Linux systems.
- Updated C API: This improves the way programmers can connect to and use LDAP directory servers.
- Enhanced Stand-Alone LDAP Server
- DIFv1 Support: It provides full compliance with the LDAP Data Interchange Format (LDIF) version 1.
In this guide, we will learn how to install and configure the OpenLDAP Server on Rocky Linux 8 / AlmaLinux 8.
Prepare Your Server
Before we begin the installation, you need to ensure the server is updated:
sudo dnf update -yOnce complete, check if a reboot is required and perform it:
[ -f /var/run/reboot-required ] && sudo reboot -fSet the correct hostname of the system.
sudo hostnamectl set-hostname ldapmaster.seoxoom.comUpdate the /etc/hosts with the correct hostnames and IPs as shown:
$ sudo vim /etc/hosts
192.168.205.2 ldapmaster.seoxoom.com
192.168.205.13 ldapclient.seoxoom.com
Step 1 – Install OpenLDAP packages
Once all the above activities have been performed, enable the symas repository, that provides the OpenLDAP packages.
sudo wget -q https://repo.symas.com/configs/SOFL/rhel8/sofl.repo -O /etc/yum.repos.d/sofl.repoOnce the repository has been enabled, install the packages with the command:
sudo dnf install symas-openldap-clients symas-openldap-serversDependency Tree:
Dependencies resolved.
================================================================================
 Package                      Architecture Version             Repository  Size
================================================================================
Installing:
 symas-openldap-clients       x86_64       2.4.59-1.el8        sofl       203 k
 symas-openldap-servers       x86_64       2.4.59-1.el8        sofl       2.2 M
Installing dependencies:
 symas-openldap               x86_64       2.4.59-1.el8        sofl       345 k

Transaction Summary
================================================================================
Install  3 Packages

Total download size: 2.8 M
Installed size: 6.8 M
Is this ok [y/N]: y
Once the installation is complete, verify as shown:
$ rpm -qa | grep ldap
symas-openldap-2.4.59-1.el8.x86_64
openldap-2.4.46-18.el8.x86_64
symas-openldap-servers-2.4.59-1.el8.x86_64
sssd-ldap-2.6.2-3.el8.x86_64
symas-openldap-clients-2.4.59-1.el8.x86_64
Step 2 – Configure OpenLDAP Server
Once the installation is complete, you can make several adjustments to the OpenLDAP Server. Some of the required configurations are:
1. Configure SLAPD database
Now prepare the database template DB_CONFIG;
sudo cp /usr/share/openldap-servers/DB_CONFIG.example /var/lib/ldap/DB_CONFIGet the correct permissions for the file:
sudo chown ldap. /var/lib/ldap/DB_CONFIG Now start and enable the slapd service on Rocky Linux 8 / AlmaLinux 8
sudo systemctl enable --now slapdVerify if the service is running:
$ systemctl status slapd
● slapd.service - OpenLDAP Server Daemon
   Loaded: loaded (/usr/lib/systemd/system/slapd.service; enabled; vendor preset: disabled)
   Active: active (running) since Sat 2022-09-24 04:37:08 EDT; 13s ago
     Docs: man:slapd
           man:slapd-config
           man:slapd-hdb
           man:slapd-mdb
           file:///usr/share/doc/openldap-servers/guide.html
  Process: 3917 ExecStart=/usr/sbin/slapd -u ldap -h ldap:/// ldaps:/// ldapi:/// (code=exited, status=0/SUCCESS)
  Process: 3904 ExecStartPre=/usr/libexec/openldap/check-config.sh (code=exited, status=0/SUCCESS)
 Main PID: 3919 (slapd)
    Tasks: 2 (limit: 23198)
   Memory: 3.1M
   CGroup: /system.slice/slapd.service
           └─3919 /usr/sbin/slapd -u ldap -h ldap:/// ldaps:/// ldapi:///
Allow the service through the firewall:
sudo firewall-cmd --add-service={ldap,ldaps} --permanent
sudo firewall-cmd --reload
There are several attributes involved when configuring the OpenLDAP Server. These are:
- CN – Common Name
- O – Organizational
- OU – Organizational Unit
- SN – Last Name
- DC – Domain Component(DC often comes with two entries dc=example,dc=com)
- DN – Distinguished Name
2. Create the admin password
First, generate the admin password using slappasswd utility.
$ slappasswd
New password:
Re-enter new password:
{SSHA}Z6wjWlDYAgHkMpezhpCRSw3fGCLiNdMM
The password hash starting with {SSHA} is an encrypted format of the password. Now, create a .ldif with the below content:
$ vim changerootpw.ldif
dn: olcDatabase={0}config,cn=config
changetype: modify
add: olcRootPW
olcRootPW: {SSHA}Z6wjWlDYAgHkMpezhpCRSw3fGCLiNdMM
To modify the root password using the created LDIF file as shown:
$ sudo ldapadd -Y EXTERNAL -H ldapi:/// -f changerootpw.ldif
ASL/EXTERNAL authentication started
SASL username: gidNumber=0+uidNumber=0,cn=peercred,cn=external,cn=auth
SASL SSF: 0
modifying entry "olcDatabase={0}config,cn=config"
3. Import basic Schemas
There are several schemas required by OpenLDAP. These include Attribute Types, Attribute Syntaxes, Matching Rules, and types of objects that a directory may have. By default, the schemas are stored under /etc/openldap/schema/. For now, we need the cosine, nis & inetorgperson LDAP schemas.
To import them, use the command:
sudo ldapadd -Y EXTERNAL -H ldapi:/// -f /etc/openldap/schema/cosine.ldif
sudo ldapadd -Y EXTERNAL -H ldapi:/// -f /etc/openldap/schema/nis.ldif
sudo ldapadd -Y EXTERNAL -H ldapi:/// -f /etc/openldap/schema/inetorgperson.ldif
Create the OpenLDAP SUDO schema;
sudo cp /usr/share/doc/sudo/schema.OpenLDAP /etc/openldap/schema/sudo.schemaCreate the sudo schema LDIF file;
sudo tee  /etc/openldap/schema/sudo.ldif<<EOF
dn: cn=sudo,cn=schema,cn=config
objectClass: olcSchemaConfig
cn: sudo
olcAttributeTypes: ( 1.3.6.1.4.1.15953.9.1.1 NAME 'sudoUser' DESC 'User(s) who may  run sudo' EQUALITY caseExactIA5Match SUBSTR caseExactIA5SubstringsMatch SYNTAX 1.3.6.1.4.1.1466.115.121.1.26 )
olcAttributeTypes: ( 1.3.6.1.4.1.15953.9.1.2 NAME 'sudoHost' DESC 'Host(s) who may run sudo' EQUALITY caseExactIA5Match SUBSTR caseExactIA5SubstringsMatch SYNTAX 1.3.6.1.4.1.1466.115.121.1.26 )
olcAttributeTypes: ( 1.3.6.1.4.1.15953.9.1.3 NAME 'sudoCommand' DESC 'Command(s) to be executed by sudo' EQUALITY caseExactIA5Match SYNTAX 1.3.6.1.4.1.1466.115.121.1.26 )
olcAttributeTypes: ( 1.3.6.1.4.1.15953.9.1.4 NAME 'sudoRunAs' DESC 'User(s) impersonated by sudo (deprecated)' EQUALITY caseExactIA5Match SYNTAX 1.3.6.1.4.1.1466.115.121.1.26 )
olcAttributeTypes: ( 1.3.6.1.4.1.15953.9.1.5 NAME 'sudoOption' DESC 'Options(s) followed by sudo' EQUALITY caseExactIA5Match SYNTAX 1.3.6.1.4.1.1466.115.121.1.26 )
olcAttributeTypes: ( 1.3.6.1.4.1.15953.9.1.6 NAME 'sudoRunAsUser' DESC 'User(s) impersonated by sudo' EQUALITY caseExactIA5Match SYNTAX 1.3.6.1.4.1.1466.115.121.1.26 )
olcAttributeTypes: ( 1.3.6.1.4.1.15953.9.1.7 NAME 'sudoRunAsGroup' DESC 'Group(s) impersonated by sudo' EQUALITY caseExactIA5Match SYNTAX 1.3.6.1.4.1.1466.115.121.1.26 )
olcObjectClasses: ( 1.3.6.1.4.1.15953.9.2.1 NAME 'sudoRole' SUP top STRUCTURAL DESC 'Sudoer Entries' MUST ( cn ) MAY ( sudoUser $ sudoHost $ sudoCommand $ sudoRunAs $ sudoRunAsUser $ sudoRunAsGroup $ sudoOption $ description ) )
EOF
Apply the configurations:
sudo ldapadd -Y EXTERNAL -H ldapi:/// -f /etc/openldap/schema/sudo.ldif4. Update the Domain Name in the LDAP Database
We will create another LDIF file with our domain name, admin user(Manager), and the encrypted password as shown:
$ vim setdomainname.ldif
dn: olcDatabase={2}mdb,cn=config
changetype: modify
replace: olcSuffix
olcSuffix: dc=seoxoom,dc=com

dn: olcDatabase={2}mdb,cn=config
changetype: modify
replace: olcRootDN
olcRootDN: cn=Manager,dc=seoxoom,dc=com

dn: olcDatabase={2}mdb,cn=config
changetype: modify
replace: olcRootPW
olcRootPW: {SSHA}Z6wjWlDYAgHkMpezhpCRSw3fGCLiNdMM

dn: olcDatabase={1}monitor,cn=config
changetype: modify
replace: olcAccess
olcAccess: {0}to * by dn.base="gidNumber=0+uidNumber=0,cn=peercred,cn=external,cn=auth"
  read by dn.base="cn=Manager,dc=seoxoom,dc=com" read by * none
To apply the changes, run:
sudo ldapmodify -Y EXTERNAL -H ldapi:/// -f setdomainname.ldifStep 3 – Create an Organizational Unit on OpenLDAP
To create an organizational unit (OU). We need to create a file with the entries below;
$ vim adddomain.ldif
dn: dc=seoxoom,dc=com
objectClass: top
objectClass: dcObject
objectclass: organization
o: My example Organisation
dc: seoxoom

dn: cn=Manager,dc=seoxoom,dc=com
objectClass: organizationalRole
cn: Manager
description: OpenLDAP Manager

dn: ou=People,dc=seoxoom,dc=com
objectClass: organizationalUnit
ou: People

dn: ou=Group,dc=seoxoom,dc=com
objectClass: organizationalUnit
ou: Group
To apply the changes, run:
$ sudo ldapadd -x -D cn=Manager,dc=seoxoom,dc=com -W -f adddomain.ldif
Enter LDAP Password: Enter_set_password_here
adding new entry "dc=seoxoom,dc=com"

adding new entry "cn=Manager,dc=seoxoom,dc=com"

adding new entry "ou=People,dc=seoxoom,dc=com"

adding new entry "ou=Group,dc=seoxoom,dc=com"
Step 4 – Manage Users On the OpenLDAP Server
To add a user account on OpenLDAP, create a file:
vim addtestuser.ldifIn the file, add the below lines and make changes where required.
dn: uid=testuser,ou=People,dc=seoxoom,dc=com
objectClass: inetOrgPerson
objectClass: posixAccount
objectClass: shadowAccount
cn: testuser
sn: temp
userPassword: {SSHA}XXXXXXXXXXXXXXXXXXXX
loginShell: /bin/bash
uidNumber: 2000
gidNumber: 2000
homeDirectory: /home/testuser
shadowLastChange: 0
shadowMax: 0
shadowWarning: 0

dn: cn=testuser,ou=Group,dc=seoxoom,dc=com
objectClass: posixGroup
cn: testuser
gidNumber: 2000
memberUid: testuser
You can create a user password using the slappasswd utility and replace it at userPassword: {SSHA}XXXXXXXXXXXXXXXXXXXX
Now apply the changes:
$ sudo ldapadd -x -D cn=Manager,dc=seoxoom,dc=com -W -f addtestuser.ldif
Enter LDAP Password:
adding new entry "uid=testuser,ou=People,dc=seoxoom,dc=com"

adding new entry "cn=testuser,ou=Group,dc=seoxoom,dc=com"
Once created, verify if the user has been added.
ldapsearch -x cn=testuser -b dc=seoxoom,dc=comSample Output:
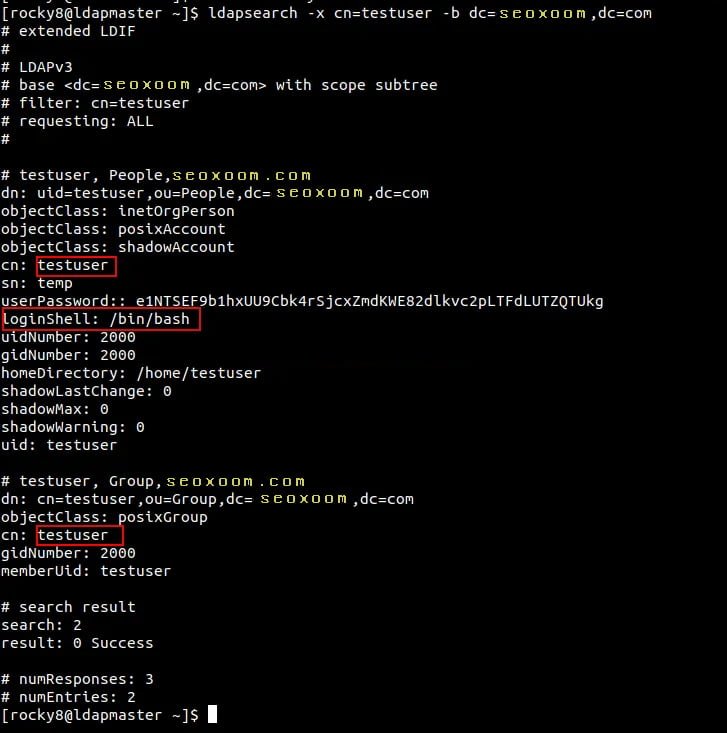
Delete users from the LDAP database
It is also possible to remove a user from the database. For example, to delete the created user above from our LDAP server, we will use the commands:
sudo ldapdelete -x -W -D 'cn=Manager,dc=seoxoom,dc=com' "uid=testuser1,ou=People,dc=seoxoom,dc=com"
sudo ldapdelete -x -W -D 'cn=Manager,dc=seoxoom,dc=com' "cn=testuser1,ou=Group,dc=seoxoom,dc=com"
Step 5 – Configure OpenLDAP SSL/TLS
To can set a secure client-server communication for OpenLDAP. You need to generate the SSL certificates for OpenLDAP.
For example, you can generate self-signed certificates as shown;
sudo openssl req -x509 -nodes -days 365
  -newkey rsa:2048
  -keyout /etc/pki/tls/ldapserver.key
  -out /etc/pki/tls/ldapserver.crt
Once generated, set the correct ownership:
sudo chown ldap:ldap /etc/pki/tls/{ldapserver.crt,ldapserver.key}$ vim add-tls.ldif
dn: cn=config
changetype: modify
add: olcTLSCACertificateFile
olcTLSCACertificateFile: /etc/pki/tls/ldapserver.crt
-
add: olcTLSCertificateKeyFile
olcTLSCertificateKeyFile: /etc/pki/tls/ldapserver.key
-
add: olcTLSCertificateFile
olcTLSCertificateFile: /etc/pki/tls/ldapserver.crtApply the changes:
sudo ldapadd -Y EXTERNAL -H ldapi:/// -f add-tls.ldifFinally, update the OpenLDAP config:
$ sudo vim /etc/openldap/ldap.conf
...
#TLS_CACERT     /etc/pki/tls/cert.pem
TLS_CACERT     /etc/pki/tls/ldapserver.crt
For the changes to apply, restart the service:
sudo systemctl restart slapdConclusion
That marks the end of this guide on how to install and configure OpenLDAP Server on Rocky Linux 8 / AlmaLinux 8. At this point, you should be able to configure OpenLDAP and create users, and groups and even add TLS certificates.