Integrating a BSNL SIP Trunk into your VoIP infrastructure is a cost-effective way to manage high-volume long-distance and international calling. By replacing traditional PSTN lines with a single IP-based connection, businesses can support over 1,000 simultaneous calls.
This guide provides the technical steps to configure BSNL connectivity on Asterisk-based platforms, including Vicidial, GoAutoDial, and FreePBX.
In Asterisk, begin by creating a SIP user in your system’s PBX. This will be used to register with BSNL’s SIP server. Make sure to use a username and password that is provided by your BSNL account. Next add the following to your /etc/asterisk/sip.conf file:
Prerequisites: Information from BSNL
Before starting, ensure you have the following details provided by your BSNL representative:
- Customer IP/Subnet: (e.g.,
172.23.1.149 / 255.255.224.0) - Gateway IP: (e.g.,
172.23.0.1) - Outbound Proxy (SBC IP): (e.g.,
10.191.5.1) - SIP Domain: (e.g.,
kl.stbi.ims.bsnl.in) - Authentication Credentials: Your Pilot Number (
+91...) and Password.
[bsnl]
type=peer

username=USERNAME

secret=PASSWORD

host=sip.bsnl.in

context=sip-inbound

canreinvite=no

qualify=yes

nat=yes

dtmfmode=rfc2833

disallow=all

allow=ulaw

allow=alaw
Now restart the Asterisk system and run the command “sip show peers” to make sure the SIP trunk is created correctly.
To configure this SIP trunk in Vicidial:
1. Go to Admin > Carriers and add a carrier profile giving the name ‘BSNL SIP Trunk’
2. In Profile Settings, click Yes to enable the Carrier
3. Choose ‘SIP/IAX2’ for carrier protocol
4. Enter the username and password in the necessary fields
5. Select ‘Yes’ in ‘Register String’
6. Set ‘Reg Expire:’ to ‘600’
7. In ‘Dialplan Entry:’ type this – ‘exten => _X.,1,Dial(SIP/${EXTEN})’
After adding the profile and making any necessary customizations, click ‘Save and Update Settings’. The BSNL SIP trunk is now ready to use in Vicidial.
The above steps should help you configure the BSNL SIP trunk in Asterisk and Vicidial. Be sure to read through these instructions carefully and in full before setting up the trunk. Any errors during setup can prevent the trunk from working properly.
How to configure BSNL sip trunk in asterisk – freepbx – vicidial? In this article i have provided the steps to configure the BSNL SIP/Voip trunk in asterisk based PBX like Freepbx, Vicidial ,Goautodial etc. The configuration includes Asterisk sip.conf settings and Dialplan settings
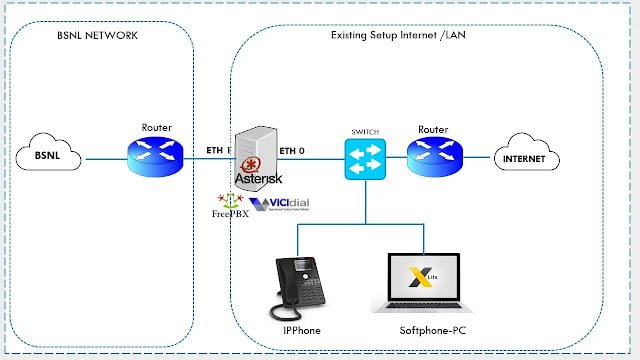
Network Connectivity: BSNL SIP
BSNL SIP trunk is provided to customer via dedicated SBC gateway and router, for which you need a additional ethernet port on your asterisk server or you need to setup your LAN in the same subnet range provide by BSNL. ref below Pic for better understanding
Step 1: Network Interface Configuration
BSNL usually provides SIP trunks via a dedicated SBC gateway. You must assign the BSNL-provided IP to a secondary Ethernet port (e.g., eth1).
For CentOS-based systems, edit your network script:
vi /etc/sysconfig/network-scripts/ifcfg-eth1Add the following:
DEVICE=eth1
IPADDR=172.23.1.149
NETMASK=255.255.224.0
GATEWAY=172.23.0.1
ONBOOT=yes
Restart networking: systemctl restart network.
Step 2: Establish Static Routing
Since the BSNL SBC and Media IPs often reside on a different subnet, you must tell your server how to find them.
Temporary Command:
ip route add 10.191.5.1/32 via 172.23.0.1 dev eth1
ip route add 10.191.5.8/32 via 172.23.0.1 dev eth1
Permanent Configuration (CentOS):
This step is required if the BSNL SBC IP and your IP is in different subnet then you need a static route to reach the SBC IP. and Media IP
for eg : my SBC ip is 10.191.5.1 and media ip 10.191.5.8
Edit the route-eth1 for manual entry for static route. Note this is for centos based server.
vi /etc/sysconfig/network-scripts/route-eth1
10.191.5.1/32 via 172.23.0.1
10.191.5.8/32 via 172.23.0.1
Step 3: Map the BSNL Domain
BSNL requires the From header to match their domain. Add a static entry in your hosts file to map their domain to the SBC IP.
vi /etc/hosts
Add this line:
10.191.5.1 kl.stbi.ims.bsnl.inStep 4: Asterisk Peer Configuration
For Vicidial – goautodial you can use the admin utility to configure below settings.
For Freepbx you can use the GUI trunk configuration
Add these settings to your sip.conf (or the Trunk settings in FreePBX/Vicidial).
Registration String:
register => +91XXXXXXXXXX:PASSWORD:[email protected]@kl.stbi.ims.bsnl.in/+91XXXXXXXXXX
note: replace 444444XXXXX with your actual bsnl pilot number/username
Peer Settings ([bsnlsip]):
[bsnlsip]
type=friend
host=kl.stbi.ims.bsnl.in
[email protected]
fromdomain=kl.stbi.ims.bsnl.in
secret=YOUR_PASSWORD
context=trunkinbound
dtmfmode=rfc2833
disallow=all
allow=ulaw
allow=alaw
nat=force_rport,comedia
insecure=invite,port
qualify=yes
canreinvite=no
progressinband=yes
Step 5: Dialplan Configuration
To ensure calls are authorized, you must include the P-Preferred-Identity header in your dialplan.
For Vicidial/GoAutoDial:
exten => _9X.,1,AGI(agi://127.0.0.1:4577/call_log)
exten => _9X.,n,SipAddHeader(P-Preferred-Identity: <sip:[email protected]>)
exten => _9X.,n,Progress()
exten => _9X.,n,Dial(SIP/${EXTEN:1}@bsnlsip,,tTor)
exten => _9X.,n,Hangup()
For Plain Asterisk or FreePBX:
exten => _9X.,1,SipAddHeader(P-Preferred-Identity: <sip:[email protected]>)
exten => _9X.,n,Progress()
exten => _9X.,n,Dial(SIP/${EXTEN:1}@bsnlsip,,tTor)
exten => _9X.,n,Hangup()
Troubleshooting Tips
- Verification: Run
asterisk -rvvvand typesip show peersto check if the trunk is “OK”. - Registration: Use
sip show registryto confirm the status is “Registered”. - NAT: If you experience one-way audio, double-check your
natsettings and ensure your local firewall allows the BSNL Media IP range.
Conclusion:
Hope this article is useful , for professional support reach me at [email protected]