How to – Setup a slave DB for a scratch installed ViciDial. This Article will go over how to setup a slave database server for your ViciDial cluster when using a scratch installed server bunch. For this particular example I have used Alma Linux 8.5 which installs Mysql 10.3.28, if you followed my scratch instructions. This process was a pain in the arse, but after much trial and error I was able to get it done and here is how I did it:
Step 1 – Edit the MySQL config file
Add these lines to /etc/my.cnf below [mysqld] on both the master and slave database:
log_bin=/var/lib/mysql/mysql-bin
relay_log=/var/lib/mysql/mysql-relay-bin
binlog_format=mixed
binlog_direct_non_transactional_updates=1
datadir = /srv/mysql/data
log-bin=mysql-bin
server-id       = 1
slave-skip-errors = 1032,1690,1062
replicate-ignore-db=mysql
replicate-do-db=asterisk
slave_parallel_threads=40
slave-parallel-mode=optimistic
slave_parallel_max_queued=5242880
Step 2 – Create the slave user on both servers
Go into MySQL and create the slave user and do this on both servers
CREATE USER 'slave'@'localhost' IDENTIFIED BY 'slave1234';
CREATE USER 'slave'@'%' IDENTIFIED BY 'slave1234';
GRANT SELECT, CREATE, INSERT, UPDATE, DELETE, ALTER, DROP, INDEX on asterisk.* TO slave@'%' IDENTIFIED BY 'slave1234';
GRANT SELECT, CREATE, INSERT, UPDATE, DELETE, ALTER, DROP, INDEX on asterisk.* TO slave@localhost IDENTIFIED BY 'slave1234';
grant replication slave on . to slave@'%' identified by 'slave1234';
grant replication slave on . to slave@'localhost' identified by 'slave1234';
flush privileges;
Create slave user on both the master and slave DB
Step 3 – Change some setting on the slave DB
Now we need to change some of the settings for the slave DB and add a couple more lines. Change the server-id to 2 instead of 1 in /etc/my.cnf and add the read_only=1 and report-host=whatever the slave DB host is
server-id=2
# read only yes
read_only=1
# define own hostname
report-host=slavedb.yourserver.com
Step 4 – Restart the MySQL services on both servers
Run the following command on both servers:
service mysql restartStep 5 – Create the MySQL dump to send over to the slave DB from the master
We need to create the MySQL dump and send it over to the slave using the scp command like so:
mkdir /home/mariadb_backup
mariabackup --backup --target-dir /home/mariadb_backup -u root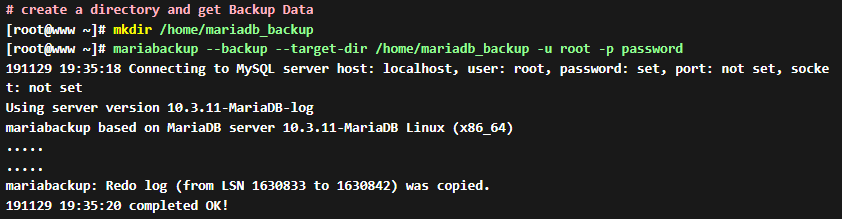
Create MySQL dump file
Once thats done go ahead and zip up the files and send the file over by typing the following:
cd /home/mariadb_backup
zip -r mysqldump.zip *
scp mysqldump.zip 192.168.1.10:/root/
Why we are here, lets lock the MySQL tables on the master:
mysql
FLUSH TABLES WITH READ LOCK;
exit
Step 6 – Connect to Slave DB and extract the files and load it into the slave
ssh into your slave db server and change directory to /root then create the folder and extract the files like so:
cd /root
mkdir mariadb_backup
mv mysqldump.zip mariadb_backup/
cd mariadb_backup/
unzip mysqldump.zip
systemctl stop mariadb
rm -rf /var/lib/mysql/*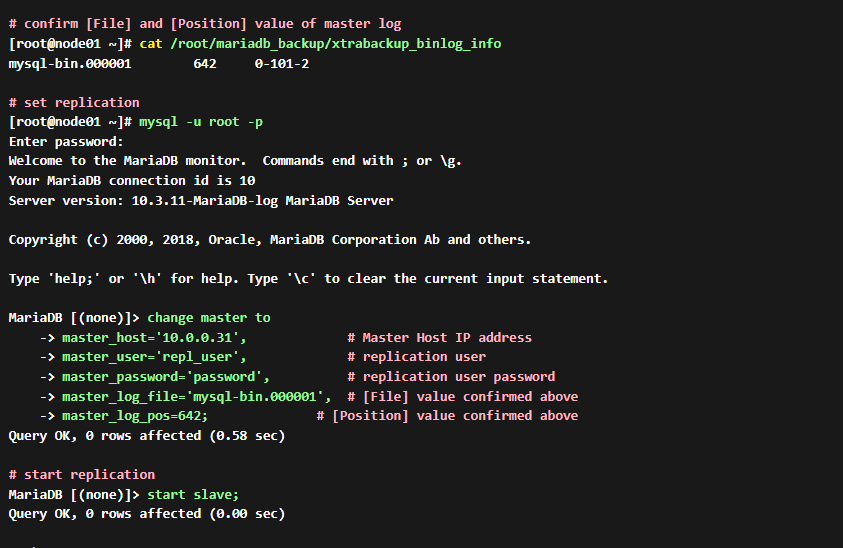
Now run the following commands that are BOLD to import the MySQL dump and set its position to match that of the master.
# run prepare task before restore task (OK if [completed OK])
[root@node01 ~]# mariabackup --prepare --target-dir /root/mariadb_backup
mariabackup based on MariaDB server 10.3.28-MariaDB Linux (x86_64)
mariabackup: cd to /root/mariadb_backup/
.....
.....
2019-11-29 19:38:20 0 [Note] InnoDB: Starting crash recovery from checkpoint LSN=1630833
Last binlog file , position 0
191129 19:38:21 completed OK!

# run restore
[root@node01 ~]# mariabackup --copy-back --target-dir /root/mariadb_backup
mariabackup based on MariaDB server 10.3.28-MariaDB Linux (x86_64)
191129 19:39:21 [01] Copying ibdata1 to /var/lib/mysql/ibdata1
191129 19:39:21 [01]        ...done
.....
.....
191129 19:39:21 [01] Copying ./xtrabackup_binlog_pos_innodb to /var/lib/mysql/xtrabackup_binlog_pos_innodb
191129 19:39:21 [01]        ...done
191129 19:39:21 completed OK!

[root@node01 ~]# chown -R mysql. /var/lib/mysql
[root@node01 ~]# systemctl start mariadb
# confirm [File] and [Position] value of master log
[root@node01 ~]# cat /root/mariadb_backup/xtrabackup_binlog_info
mysql-bin.000001        642     0-101-2

# set replication
[root@node01 ~]# mysql -u root -p
Enter password:
Welcome to the MariaDB monitor.  Commands end with ; or \g.
Your MariaDB connection id is 10
Server version: 10.3.28-MariaDB-log MariaDB Server

Copyright (c) 2000, 2018, Oracle, MariaDB Corporation Ab and others.

Type 'help;' or '\h' for help. Type '\c' to clear the current input statement.

MariaDB [(none)]> change master to
    -> master_host='10.0.0.31',             # Master Host IP address
    -> master_user='repl_user',             # replication user
    -> master_password='password',          # replication user password
    -> master_log_file='mysql-bin.000001',  # [File] value confirmed above
    -> master_log_pos=642;              # [Position] value confirmed above
Query OK, 0 rows affected (0.58 sec)

# start replication
MariaDB [(none)]> start slave;
Query OK, 0 rows affected (0.00 sec)

# show status
MariaDB [(none)]> show slave status\G
*************************** 1. row ***************************
                Slave_IO_State: Waiting for master to send event
                   Master_Host: 10.0.0.31
                   Master_User: repl_user
                   Master_Port: 3306
                 Connect_Retry: 60
               Master_Log_File: mysql-bin.000001
           Read_Master_Log_Pos: 642
                Relay_Log_File: mariadb-relay-bin.000002
                 Relay_Log_Pos: 555
         Relay_Master_Log_File: mysql-bin.000001
              Slave_IO_Running: Yes
             Slave_SQL_Running: Yes
               Replicate_Do_DB:
           Replicate_Ignore_DB:
            Replicate_Do_Table:
        Replicate_Ignore_Table:
       Replicate_Wild_Do_Table:
   Replicate_Wild_Ignore_Table:
                    Last_Errno: 0
                    Last_Error:
                  Skip_Counter: 0
           Exec_Master_Log_Pos: 642
               Relay_Log_Space: 866
               Until_Condition: None
                Until_Log_File:
                 Until_Log_Pos: 0
            Master_SSL_Allowed: No
            Master_SSL_CA_File:
            Master_SSL_CA_Path:
               Master_SSL_Cert:
             Master_SSL_Cipher:
                Master_SSL_Key:
         Seconds_Behind_Master: 0
 Master_SSL_Verify_Server_Cert: No
                 Last_IO_Errno: 0
                 Last_IO_Error:
                Last_SQL_Errno: 0
                Last_SQL_Error:
   Replicate_Ignore_Server_Ids:
              Master_Server_Id: 101
                Master_SSL_Crl:
            Master_SSL_Crlpath:
                    Using_Gtid: No
                   Gtid_IO_Pos:
       Replicate_Do_Domain_Ids:
   Replicate_Ignore_Domain_Ids:
                 Parallel_Mode: conservative
                     SQL_Delay: 0
           SQL_Remaining_Delay: NULL
       Slave_SQL_Running_State: Slave has read all relay log; waiting for the slave I/O thread to update it
              Slave_DDL_Groups: 0
Slave_Non_Transactional_Groups: 0
    Slave_Transactional_Groups: 0
1 row in set (0.000 sec)
Step 7 – Unlock the Master DB
Now go back into the master DB and unlock the tables:
mysql
unlock tables;
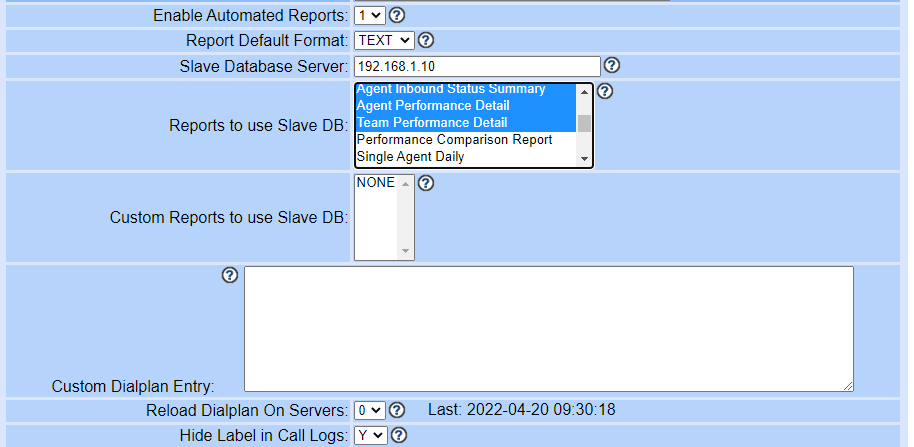
Step 8 – Set the Slave DB in ViciDIal
Now you can set the slave server info in ViciDial by going into the admin GUI and going into system settings. Set the slave DB server IP and choose which reports you want to display from it.
Well, this has been quite the nightmare to get it done and hopefully I can save some of you some time with this article.