The release of Kubeshark has been positively received by the Kubernetes community and is the perfect tool to help Kubernetes administrators and users gain visibility into the inner workings of the Kubernetes cluster. Kubeshark helps improve performance and security, as well as simplifying debugging tasks across the Kubernetes environment. If you are a Kubernetes user, Kubeshark is a must-have analysis and profiling tool for your Kubernetes journey.
In recent years, the need for better data analysis and visibility of Kubernetes API traffic has grown exponentially, to help monitor the performance and security of the Kubernetes cluster. To better enable analysis and visibility of Kubernetes API traffic, a new open source Kubernetes Analysis and Profiling Tool, Kubeshark, has been released. Kubeshark is a command line based interactive debugging and analysis tool for Kubernetes clusters, and it is capable of performing a wide range of Kubernetes debugging tasks.
Kubeshark enables the ingesting and analyzing of Kubernetes API traffic data. This data can come from any of the Kubernetes components, such as the API server, scheduler, or etcd, and is visualized in the form of d3.js visualizations. The visualizations clearly demonstrate the communication between the various Kubernetes components, and offer the ability to further inspect requests and responses on a deeper level.
“In the past, troubleshooting through traffic inspection was table stakes, it was easy. With Kubernetes, it’s not easy anymore,” said Alon Girmonsky, Up9 founder and CEO. This complexity led to the development of a simple-yet-powerful API debug and troubleshooting tool for Kubernetes known as Kubeshark. This is an open-source tool from UP9 to enable developers to obtain and visualize the Kubernetes API traffic in a WebUI.
Not only does Kubeshark provide detailed information on the Kubernetes API traffic, but it also offers a rich set of debugging and analysis tools, such as statistical analytics, queries, and visualizations. The interactive debug tool supports event-level tracing, which helps users investigate the root causes behind an issue. Additionally, users can analyze resource usage, detect anomalies, and compare performance across different clusters, helping them optimize and improve the overall performance of the Kubernetes cluster.
Analyze Kubernetes API Traffic using Kubeshark. Containerization is one of the highly adopted technologies in the past decade. It allows one to run applications in a lightweight executable known as a container. These containers can be run using tools such as docker, Podman, Openshift, Kubernetes e.t.c.
As a system admin, once you deploy your workload, you need to troubleshoot these Kubernetes containers in case of errors. You can obtain insights using kubectl commands such as kubectl logs, kubectl describe, and kubectl exec. In most cases, these commands do not provide enough information to identify the root cause of a problem. This creates a high need for monitoring and logging tools in complex environments.
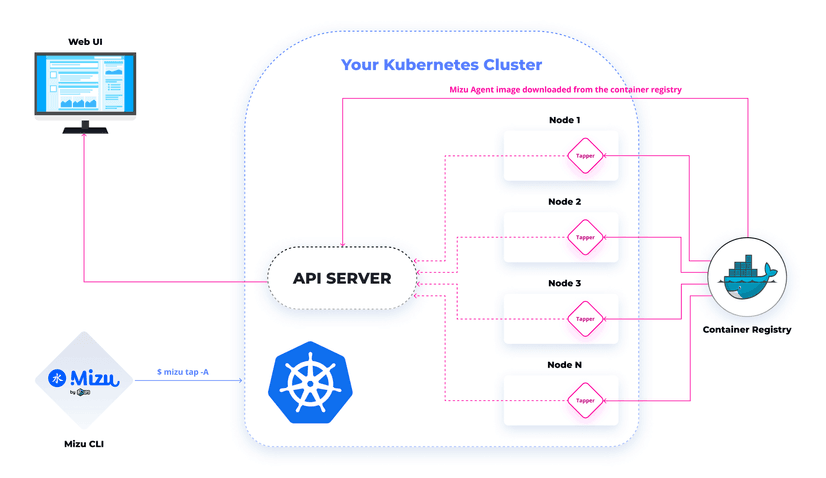
When talking about Kubeshark , think of it as TCPDump and Wireshark re-invented for Kubernetes. This is because it injects a container that performs a tcpdump-like operation at the node level of a Kubernetes cluster. The operation can be executed on demand using a CLI built on Golang without preparation.
The below diagram illustrates how Kubeshark works.
The most amazing features of Kubeshark are:
- No Installation is necessary. No Code instrumentation and is not a proxy it just performs a tcpdump-like operation at the node level of a Kubernetes cluster.
- Supports HTTP/1.x, HTTP/2, AMQP, Apache Kafka, and Redis protocols
- It allows the use of regular expressions, to observe all traffic or specific pods.
- Free and open-source. It is available for download on the GitHub repository.
- Kubeshark uses kubectl and therefore can be run on any node with kubectl configured.
In this guide, we will learn how to view and analyze Kubernetes API Traffic using Kubeshark.
Step 1 – Set up a Kubernetes Cluster
This guide requires you to have a Kubernetes cluster configured. The guides below can be used to set up a Kubernetes cluster.
- Deploy HA Kubernetes Cluster on Rocky Linux 8 using RKE2
- Run Kubernetes on Debian with Minikube
- Deploy Kubernetes Cluster on Linux With k0s
- Install Kubernetes Cluster on Ubuntu using K3s
- Install Kubernetes Cluster on Rocky Linux 8 with Kubeadm & CRI-O
- Deploy k0s Kubernetes on Rocky Linux 9 using k0sctl
- Install Minikube Rocky Linux 9 and Create Kubernetes Cluster
Once the cluster has been set up, ensure kubectl is installed.
curl -LO "https://storage.googleapis.com/kubernetes-release/release/$(curl -s https://storage.googleapis.com/kubernetes-release/release/stable.txt)/bin/linux/amd64/kubectl"
chmod +x kubectl
sudo mv kubectl /usr/local/bin
Next, export the admin config to be able to use the tool.
##For RKE2
export PATH=$PATH:/var/lib/rancher/rke2/bin export KUBECONFIG=/etc/rancher/rke2/rke2.yaml

##For K0s
export KUBECONFIG=/var/lib/k0s/pki/admin.conf
Verify if the tool is working:
$ kubectl get nodes
NAME     STATUS   ROLES           AGE     VERSION
master   Ready    control-plane   5m59s   v1.25.2+k0s
node1    Ready    <none>          4m37s   v1.25.2+k0s
node2    Ready    <none>          4m28s   v1.25.2+k0s
Step 2 – Install Kubeshark on Your System
To install Kubeshark, first, download the executable and set the correct permissions as shown.
sh <(curl -Ls https://kubeshark.co/install)Installation output:
🦈  Started to download Kubeshark
############################################################################################################################################################################################### 100.0%

⬇️  Kubeshark is downloaded into /tmp/kubeshark
Do you want to install system-wide? Requires sudo 😇 (y/N)? y
Kubeshark is installed into /usr/local/bin/kubeshark

Do you want to add 'ks' alias for Kubeshark? (y/N)? y
✅ You can use the  ks  command now.

Please give us a star 🌟 on https://github.com/kubeshark/kubeshark if you ❤️  Kubeshark!
Once the command has been executed and you have kubectl configured and points to your Kubernetes cluster, you are set to use Kubeshark.
Step 3 – Run Kubeshark on Your System
Kubeshark provides a CLI tool that can be used to obtain your Kubernetes API traffic. The CLI provides several commands that include:
- check: checks the prerequisites for Kubeshark and verifies the Kubeshark deployment health
- clean: removes all Kubeshark resources
- completion: generates the autocompletion script for the specified shell
- config: generates config with default values
- install: installs Kubeshark PRO components
- logs: creates a zip file with logs for Github issues or troubleshooting
- tap: records incoming traffic of a Kubernetes pod.
- view: connects to an existing Kubeshark deployment and opens Kubeshark UI in the browser.
- version: prints version info.
To get more help when using the CLI, use the command:
$ kubeshark help
A web traffic viewer for kubernetes
Further info is available at https://github.com/kubeshark/kubeshark

Usage:
  kubeshark [command]

Available Commands:
  check       Check the Kubeshark installation for potential problems
  clean       Removes all kubeshark resources
  completion  Generate the autocompletion script for the specified shell
  config      Generate config with default values
  help        Help about any command
  install     Installs kubeshark components
  logs        Create a zip file with logs for Github issue or troubleshoot
  tap         Record ingoing traffic of a kubernetes pod
  version     Print version info
  view        Open GUI in browser

Flags:
      --config-path string   Override config file path using --config-path (default "/Users/jkmutai/.kubeshark/config.yaml")
  -h, --help                 help for kubeshark
      --set strings          Override values using --set

Use "kubeshark [command] --help" for more information about a command.
To view Kubernetes metrics of all namespaces, use:
kubeshark tap -ASample Output:
Kubeshark will store up to 200MB of traffic, old traffic will be cleared once the limit is reached.
Tapping pods in all namespaces
+calico-node-58sb5
+calico-node-5cz2k
+calico-node-8mp4v
+calico-node-9m5tz
+calico-node-gnr26
+calico-node-jgfrm
....
+prometheus-adapter-678b454b8b-6bgqt
+prometheus-adapter-678b454b8b-974x6
+prometheus-k8s-0
+prometheus-k8s-1
+prometheus-operator-8577bd4db6-v2ngt
+nfs-provisioner-01-nfs-subdir-external-provisioner-669d6f8tqskt
Waiting for Kubeshark Agent to start...
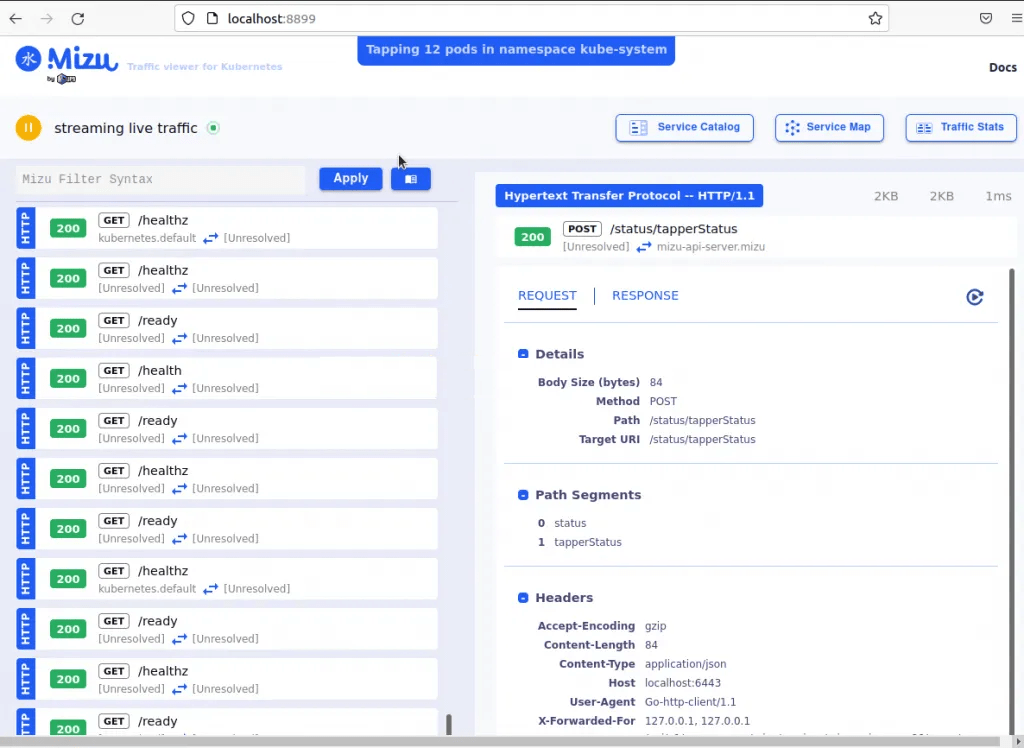
Kubeshark is available at http://localhost:8899Access the WebUI at http://localhost:8899

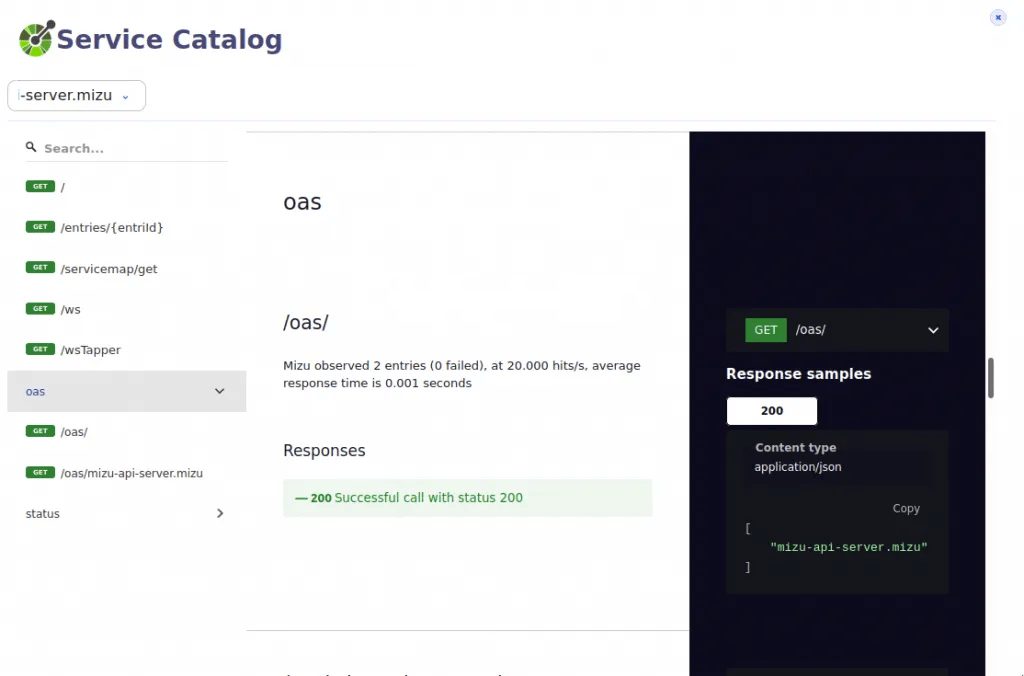
From this web Interface, you can view the service catalog
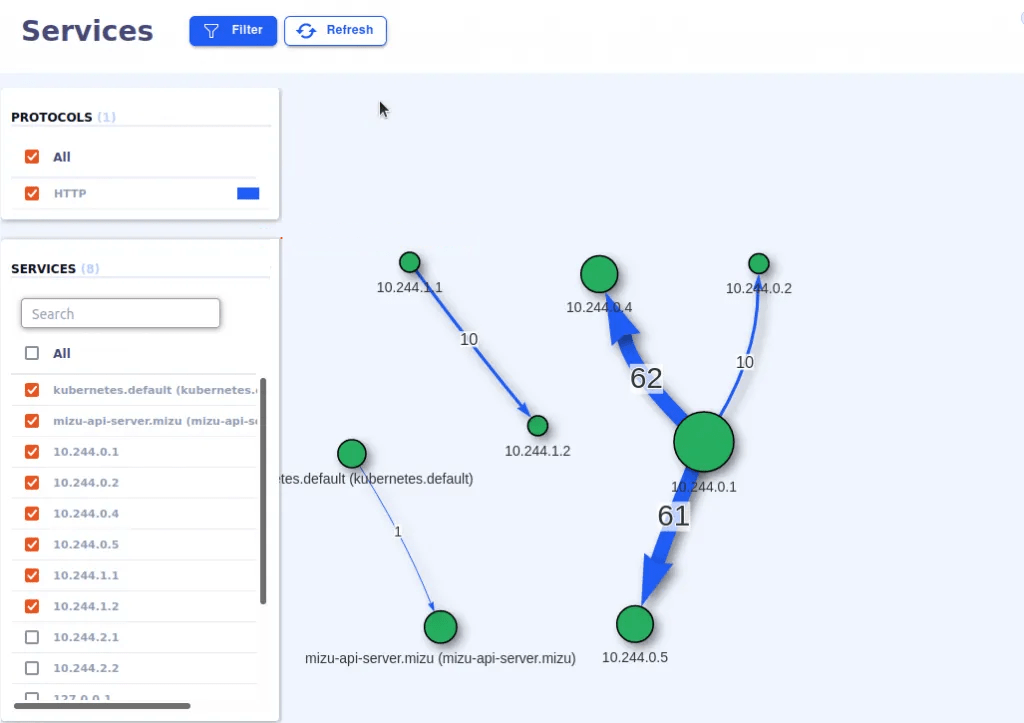
How the services are mapped in the service map tab
You can also view the traffic stats

To stop Kubeshark, use CTRL+C to stop and remove all Kubeshark resources. You can also remove the resource manually with the command:
kubeshark cleanWith the tap command, you can perform many other functions.
- View traffic of a Pod
To view traffic on a specific pod say coredns-5d5b5b96f9-9hchn in the kube-system namespace, issue the command:
kubeshark tap coredns-5d5b5b96f9-9hchn -n kube-systemYou will be able to view traffic on the specified pod.
To view traffic on several pods from different namespaces, you can use the command:
kubeshark tap "(catalo*|front-end*) -A"Where the names of the pods are:
- catalogue-6676dc489b-6tx9h
- catalogue-db-69bd898747-7p8rq
- front-end-946fd755f-8t6gp
You can also view traffic in a specific namespace say “nginx” with the command:
kubeshark tap ".*" -n nginxTo understand subcommands for a given command say tap, use the command:
$ kubeshark tap --help
Record the ingoing traffic of a kubernetes pod.
Supported protocols are HTTP and gRPC.

Usage:
  kubeshark tap [POD REGEX] [flags]

Flags:
  -A, --all-namespaces               Tap all namespaces
      --dry-run                      Preview of all pods matching the regex, without tapping them
  -p, --gui-port uint16              Provide a custom port for the web interface webserver (default 8899)
  -h, --help                         help for tap
      --insertion-filter string      Set the insertion filter. Accepts string or a file path.
      --max-entries-db-size string   Override the default max entries db size (default "200MB")
      --max-live-streams int         Maximum live tcp streams to handle concurrently (default 500)
  -n, --namespaces strings           Namespaces selector
      --profiler                     Run pprof server
      --redact                       Enables redaction of potentially sensitive request/response headers and body values
      --service-mesh                 Record decrypted traffic if the cluster is configured with a service mesh and with mtls
      --tls                          Record tls traffic

Global Flags:
      --config-path string   Override config file path using --config-path (default "/root/.kubeshark/config.yaml")
      --set strings          Override values using --set
Closing Thoughts
That marks the end of this guide on how to view and analyze Kubernetes API Traffic using Kubeshark. You can now get comprehensive microservice traffic that can help you identify the root cause of a problem on your cluster. I hope this was significant to you.