

How To Install Asterisk PBX 18 LTS on CentOS 7. We’re going to do Asterisk 18 LTS installation in this guide. This will be a complete easy to follow tutorial. For recent release of Asterisk, check out How to Install Asterisk 16 PBX on CentOS 7. So let’s start by defining what a PBX and Asterisk is?
What Is a PBX?
Asterisk, first and foremost, is a Private Branch Exchange. A PBX is a piece of equipment that handles telephone switching owned by a private business, rather than a telephone company. A PBX can be thought of as a private phone switchboard, connecting to one or more telephones on one side and usually connecting to one or more telephone lines on the other.
What is Asterisk?
Asterisk is a complete PBX. It implements all the major features of most commercially available PBXes. It also implements, for free, features that often cost a lot in a commercial installation: Conference calling, Direct Inward System Access, Call Parking, and Call Queues, just to name a few.
The basic features provided by Asterisk are:
- Caller ID
- Blacklisting (Block callers by Caller ID)
- Call Waiting
- Call Transfer
- Call Conferencing
- Conference Center/Bridging
- Do‐Not‐Disturb
- Call Forwarding
- Call Parking
- Call Detail Reporting
- Dial by Name Directory
- Interactive Voice Response (Auto Attendant)
- Time Condition Call Routing
- Call Queuing
- Call Back
- Hold Music/Recordings (MP3)
- Application Integration
- Extended Call Reporting
- DISA (Direct Inward System Access)
- Dictation
- Follow Me
- Paging/Intercom
- Ring Groups
- Graphical Call Manager
- Day/Night Controls
Among others. So let’s get started.
Step 1 – Set Server Hostname
You can set hostname and timezone before doing any installation. Use below commands.
sudo timedatectl  list-timezones
sudo timedatectl  set-timezone America/Indiana/Indianapolis
To set hostname type:
sudo hostnamectl set-hostname pbx-01.example.comIn case your CentOS server has wrong keymaps. You can fix them.
$ localectl
   System Locale: LANG=en_US.UTF-8
       VC Keymap: us
      X11 Layout: us
$ localectl list-keymaps
To set keymap to us:
sudo localectl set-keymap usYou can set the system language to English by typing following commands on your terminal as root.
sudo localectl set-locale LANG=en_US.UTF-8Step 2 – Update System and Install dependencies
First, do a system update
sudo yum -y update
sudo yum -y install "@Development Tools"
Reboot after system upgrade
sudo rebootInstall other dependencies required to build and run Asterisk 18 LTS on CentOS 7:
sudo yum -y install lynx mariadb-server mariadb php php-mysql \
  php-mbstring tftp-server httpd ncurses-devel sendmail sendmail-cf \
  sox newt-devel libxml2-devel libtiff-devel audiofile-devel gtk2-devel \
  subversion kernel-devel git php-process crontabs cronie cronie-anacron \
  wget vim php-xml uuid-devel sqlite-devel net-tools gnutls-devel php-pear \
  autoconf bzip2 libedit-devel
Install other missing dependencies, not in the previous step.
sudo yum -y install gcc gcc-c++ php-xml php php-mysql php-pear php-mbstring mariadb-devel mariadb-server mariadb sqlite-devel lynx bison psmisc tftp-server httpd make ncurses-devel libtermcap-devel sendmail sendmail-cf caching-nameserver sox newt-devel libxml2-devel libtiff-devel audiofile-devel gtk2-devel uuid-devel libtool libuuid-devel subversion kernel-devel kernel-devel-$(uname -r) git subversion kernel-devel php-process crontabs cronie cronie-anacron wget vimSetup and configure mariadb database, setting the password as well.
systemctl start mariadb
systemctl enable mariadb
Now set the password by running the command below.
sudo mysql_secure_installationJust press enter if you don’t already have a password set for mysql. Agree to remove the test database and disallow remote login.
Step 3 – Install Jasson C Library
Installing Jansson which is a C library for encoding, decoding and manipulating JSON data. Let’s download, unpack and compile it using the below command.
sudo su -
cd /usr/src
mkdir asterisk-18 && cd asterisk-18
git clone https://github.com/akheron/jansson.git
cd jansson
autoreconf  -i
./configure --prefix=/usr/
make && make install
Install Legacy Pear requirements
pear install Console_GetoptStep 4 – Install Asterisk 18 LTS on CentOS 7
Navigate to /usr/src/asterisk-18 directory and install download Asterisk 18 LTS on CentOS 7
cd  /usr/src/asterisk-18
wget http://downloads.asterisk.org/pub/telephony/dahdi-linux-complete/dahdi-linux-complete-current.tar.gz
wget http://downloads.asterisk.org/pub/telephony/libpri/libpri-current.tar.gz
wget http://downloads.asterisk.org/pub/telephony/asterisk/asterisk-18-current.tar.gz
git clone https://github.com/pjsip/pjproject.git
Compile and install DAHDI if you are connecting to PSTN. This is OPTIONAL, install if you’ll connect to PSTN.
cd  /usr/src/asterisk-18
tar xvfz dahdi-linux-complete-current.tar.gz
tar xvfz libpri-current.tar.gz
rm -f dahdi-linux-complete-current.tar.gz libpri-current.tar.gz
cd dahdi-linux-complete-*/
make all
make install
make config
cd ..
cd libpri-*/
make
make install
Compile and install pjproject
cd  /usr/src/asterisk-18
cd pjproject
CFLAGS='-DPJ_HAS_IPV6=1' ./configure --prefix=/usr \
  --enable-shared --disable-sound \
  --disable-resample --disable-video \
  --disable-opencore-amr --libdir=/usr/lib64
make dep
make all
make install
Compile and install Asterisk
cd /usr/src/asterisk-18
tar xvfz asterisk-18-current.tar.gz
cd asterisk-*
./configure --libdir=/usr/lib64
Setup menu options by running the following command
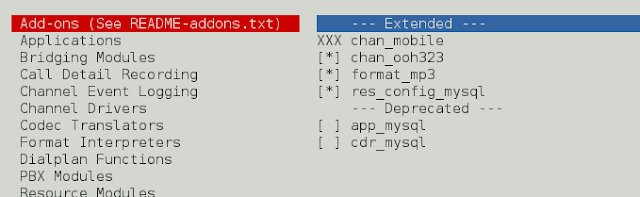
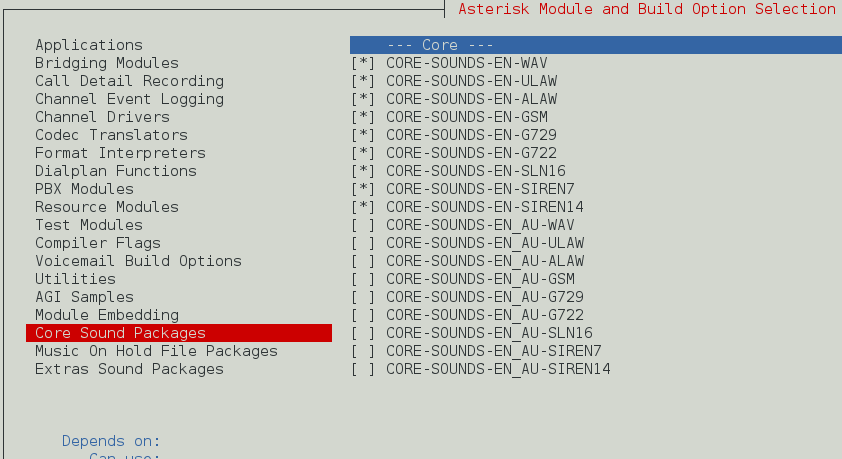
make menuselectOn Add-ons select chan_ooh323 and format_mp3 as shown below
On Core Sound Packages, select the formats of Audio packets like below
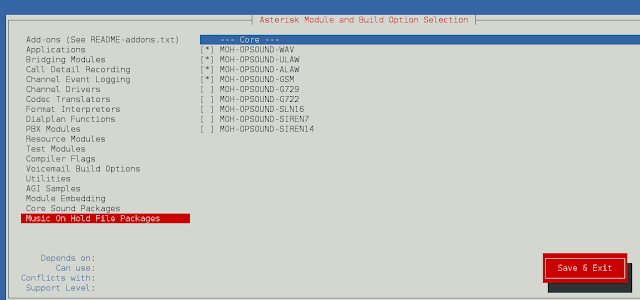
On Music On Hold, option select the following modules as shown in the picture below
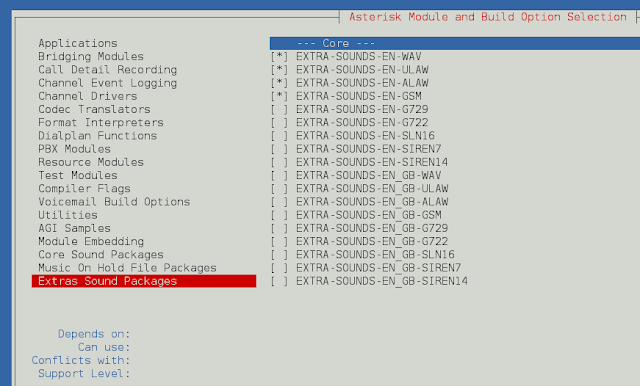
On Extra Sound Packages select as shown below:
Now run the following command to download the mp3 decoder library into the source tree.
cd /usr/src/asterisk-18/asterisk-*
contrib/scripts/get_mp3_source.sh
Do installation of selected modules
cd /usr/src/asterisk-18/asterisk-*/
make
make install
make samples
make config
Step 5 – Configure Asterisk 18 LTS on CentOS 7
Create separate user and group to run asterisk services
useradd -m asterisk
chown asterisk.asterisk /var/run/asterisk
chown -R asterisk.asterisk /etc/asterisk
chown -R asterisk.asterisk /var/{lib,log,spool}/asterisk
chown -R asterisk.asterisk /usr/lib64/asterisk
Make systemctl start asterisk by copying init script to init.d dir.
cd /usr/src/asterisk-18/asterisk-*
cp contrib/init.d/rc.redhat.asterisk  /etc/init.d/asterisk
chmod 755 /etc/init.d/asterisk
Locate asterisk by
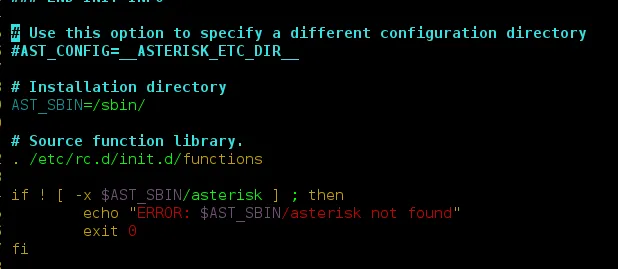
$ which asteriskThen open the file /etc/init.d/asterisk by
sudo vim /etc/init.d/asteriskReplace AST_SBIN=, with your location of asterisk binary, for my case it’s /sbin/. See below image.
Disable SELinux
sed -i 's/(^SELINUX=).*/SELINUX=disabled/' /etc/selinux/config
sestatus
Setup Asterisk Database
[root@asterisk-cloud ~]# mysql -u root -p
create user 'asterisk'@'localhost' identified by 'password';
create database cdrdb;
create database asterisk;
GRANT ALL PRIVILEGES ON asterisk.* TO asterisk@localhost IDENTIFIED BY 'password';
GRANT ALL PRIVILEGES ON cdrdb.* TO asterisk@localhost IDENTIFIED BY 'password';
flush privileges;
exit
Make all asterisk PBX ports accessible by adding the following rules
firewall-cmd --zone=public --add-port=5060/udp --permanent
firewall-cmd --zone=public --add-port=5060/tcp --permanent
firewall-cmd --zone=public --add-port=5061/udp --permanent
firewall-cmd --zone=public --add-port=5061/tcp --permanent
firewall-cmd --zone=public --add-port=4569/udp --permanent
firewall-cmd --zone=public --add-port=5038/tcp --permanent
firewall-cmd --zone=public --add-port=10000-20000/udp --permanent
Commit changes
firewall-cmd --reloadConfirm that the rules are added.
[root@asterisk-cloud ~]# firewall-cmd --zone=public --list-all
public (default, active)
  interfaces: eth0
  sources:
  services: dhcpv6-client ssh
  ports: 5061/tcp 4569/udp 5060/tcp 10000-20000/udp 5061/udp 5060/udp 5038/tcp
  masquerade: no
  forward-ports:
  icmp-blocks:
  rich rules:
Restart asterisk server
systemctl restart asteriskCheck if running
sudo systemctl status asteriskIf running and status is active then you are good to go and start configuring routes and extentions. or you can reach us at [email protected]

